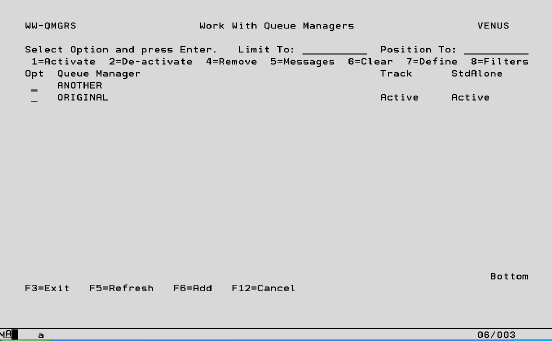
The following screen is accessed by keying option ‘24’ on the TestBench Main Menu. The Work with Queue Managers screen is used to define a Queue Manager for use within TestBench. The Queue Manager must already exist on the iSeries before it can be defined here. Once defined, a queue manager must then be activated and the Queue Manager re-started before it can be used. A minimum of one Queue Manager must exist on the iSeries in order to utilize the TestMQ functionality.
Limit To Key a character or characters to subset the display to records that have the same initial key values. Leave blank to have all records available via scrolling (or page up/down). When entering a ‘Limit To’ value, this will always be used for the ‘Position To’ value in the first instance. Once the ‘Limit To’ range has been established on the screen a ‘Position To’ may also be specified. The last value keyed is stored for each user and will automatically be defaulted into this field when the same panel is next accessed.
Position To This is a volatile field which will position records on the display starting with the characters keyed. Hence, this enables you to move quickly to the end of a long list and from there scroll up or down as required. If entered at the same time as the ‘Limit To’ field, ‘Position To’ will be ignored the next time the enter key is pressed. Once the ‘Limit To’ has been established, ‘Position to can also be keyed. If the ‘Position To’ is outside the range of available records, the display will either start or end with the closest records.
Options:
1 – Activate Activating a Queue Manager prepares it to monitor queues thereby allowing it to track sent and received messages. A confirmation screen is displayed before the activation occurs.
Once activated the Queue Manager must be re-started on the iSeries before this step will take effect. This is because the activation process makes a change to the IFS file /QIBM/UserData/mqm/qmgrs/XXX/qm.ini (where XXX is the name of the Queue Manager). A stanza called ApiExitLocal is added to the ini file. This specifies a TestBench user exit program which is then called every time a message is sent to the Queue Manager. The TestBench program logs the message in the TestBench database. Changes to the ini file are only acknowledged once the Queue Manager is re-started.
2- De-activate De-activating a Queue Manager disengages it from all queues and halts the process of tracking sent and received messages. As per the activation process, once de-activated the Queue Manager must be re-started on the iSeries before this step will take effect.
4 – Remove Deletes the Queue Manager from TestBench. This action will have no effect on the Queue Manager itself, which will remain unchanged on the iSeries. The removal of a Queue Manager will also eliminate all associated information including current standalone messages and filter organization. Messages stored in the results database for a particular Test Run will remain.
5 – Messages View all messages for all Queues actively being tracked by this Queue Manager (See Filter). Messages will only be stored if the Queue Manager has been activated and Standalone Tracking has been switched on. Messages will include message type (e.g. MQGET), message data being passed or received, as well as the date and time the message was logged.
6 – Clear Purge messages from the queue manager (see later section for more information).
7 – Define Toggle Stand Alone Tracking option on and off for the selected Queue Manager. When stand alone tracking is active, all messages for active queues will be stored and retrievable using option ‘5’. Tracking messages via a Test Case and Stand Alone Tracking are independent options and will have no affect on each other.
8 – Filter Select which Queue(s) to track from a list of Queues associated with this Queue Manager (see later section for more information).
Function Keys:
F6 – Add Define a Queue Manager that does not currently exist in TestBench. This Manager must already exist on the iSeries to be added. See the following section for more information.