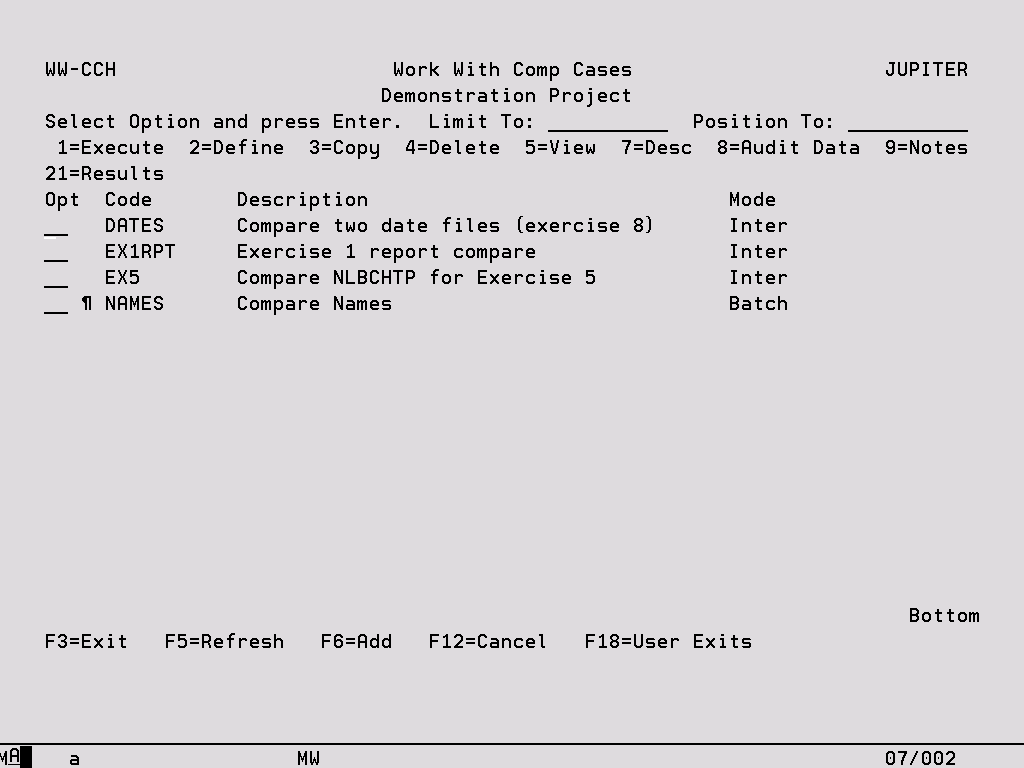
You will reach this Work With Comp Cases display either from the Main Menu or from Work With Projects. In the former case you will be prompted to select the Project in which the Comp Cases reside.
Limit To Enter a character or characters to subset the display to records that have the same initial key values. Leave blank to have all records available via scrolling (or page up/down). When entering a ‘Limit To’ value, this will always be used for the ‘Position To’ value in the first instance. Once the ‘Limit To’ range has been established on the screen a ‘Position To’ may also be specified. This value is remembered for each user and will automatically be defaulted into this field when the same panel is next accessed.
Position To This is a volatile field which will position records on the display starting with the characters keyed. Hence, this enables you to move quickly to the end of a long list and from there scroll up or down as required. If entered at the same time as the ‘Limit To’ field, ‘Position To’ will be ignored the next time the enter key is pressed. Once the ‘Limit To’ has been established, ‘Position To’ can also be keyed. If the ‘Position To’ is outside the range of available records, the display will either start or end with the closest records.
Options:
1 – Execute This option will take you to Comp Case Initiation (see specific section).
2 – Define This option will take you to Work With Comp Case Objects (see specific sections).
3 – Copy This option will allow you to copy the selected Comp Case and all its contents to another Comp Case and optionally, another Project.
4 – Delete This option will delete all information associated with a Comp Case. A warning is displayed before the delete process begins.
5 – View Display all of the details associated with the Comp Case.
7 – Desc This option will take you to Comp Case Maintenance (see specific section).
8 – Audit Data Every addition, update and deletion to a Comp Case is tracked and can be viewed here.
9 – Notes This option allows you to record notes for the Comp Case as a means of documentation.
21 – Results View details about previous Comp Case executions.
Function Keys:
F6 – Add Allows you to add a new Comp Case via Comp Case Maintenance (see below).
F18 – User Exits User Exit points can be defined which will be actioned during execution. For example, should you require a program or command to be executed after the files have been compared this can be added as a User Exit. See the System chapter for further information.
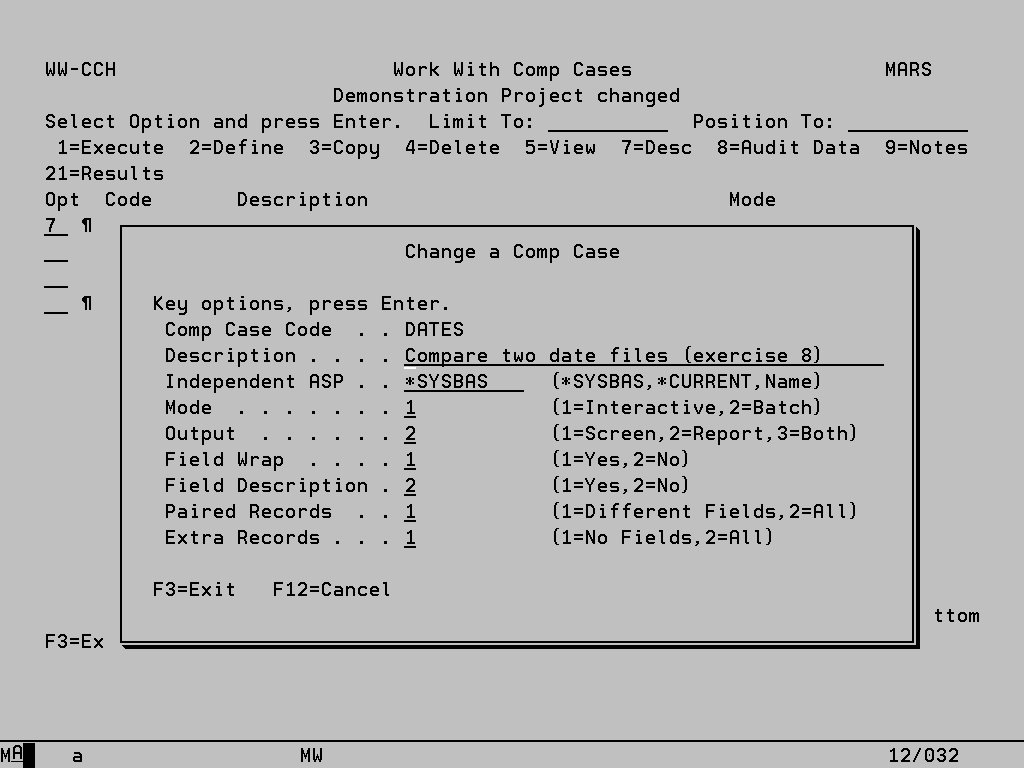
Comp Case Maintenance
This facility allows you to add or amend the basic details associated with a Comp Case. You will reach this screen if you choose to add a new Comp Case or change the description of an existing Comp Case. Both of these options are available from Work With Comp Cases.
Entries:
Comp Case Code In Add mode you should key an identifier for the Comp Case which must be unique within the current Project. This field cannot be altered in Change mode.
Description Key appropriate text to describe the current Comp Case.
Independent ASP If the files being compared reside on an Independent Auxiliary Storage Pool (IASP) other than the default of *SYSBAS, the name of the IASP can be specified here (or selected using F4). Alternatively select *CURRENT to enable whichever IASP is specified for the current job to be used. The Compare Case can then contain files in libraries on the specified IASP and on *SYSBAS.
Mode This controls how the Comp Case will be executed, ‘1’ for interactive execution or ‘2’ for batch execution.
Output The results of the Compare Case can be output to a report, to the screen or to both.
Field Wrap This option only applies to report output. If set to ‘1’, fields which have values greater than 30 characters in length will wrap around on the report so that their entire length is displayed. Option ‘2’ will print only the fist 30 characters.
Field Description If viewing results via the report, key an option ‘1’ to print the description for each field as well as the field name.
Paired Records Paired records are those records where a match is found in both files, for example if comparing by RRN then the same RRN number is found in both files and these two records can be compared. When such a match is found, option ‘1’ will report only those fields which are different, whereas option ‘2’ will list the contents of every field on each record where at least one difference is present.
Extra Records Extra records are those records where a match cannot be found in both files, for example if comparing by RRN then the RRN number is found in one file but not the other. For these records, option ‘1’ will not show any of the field values whereas option ‘2’ will list the contents of every field for the extra record.
Comp Case Objects
This facility shows what files are currently included in the current Comp Case. The initial view lists the objects in the sequence in which they will be processed. You will reach this screen by selecting ‘Define’ from Work With Comp Cases.
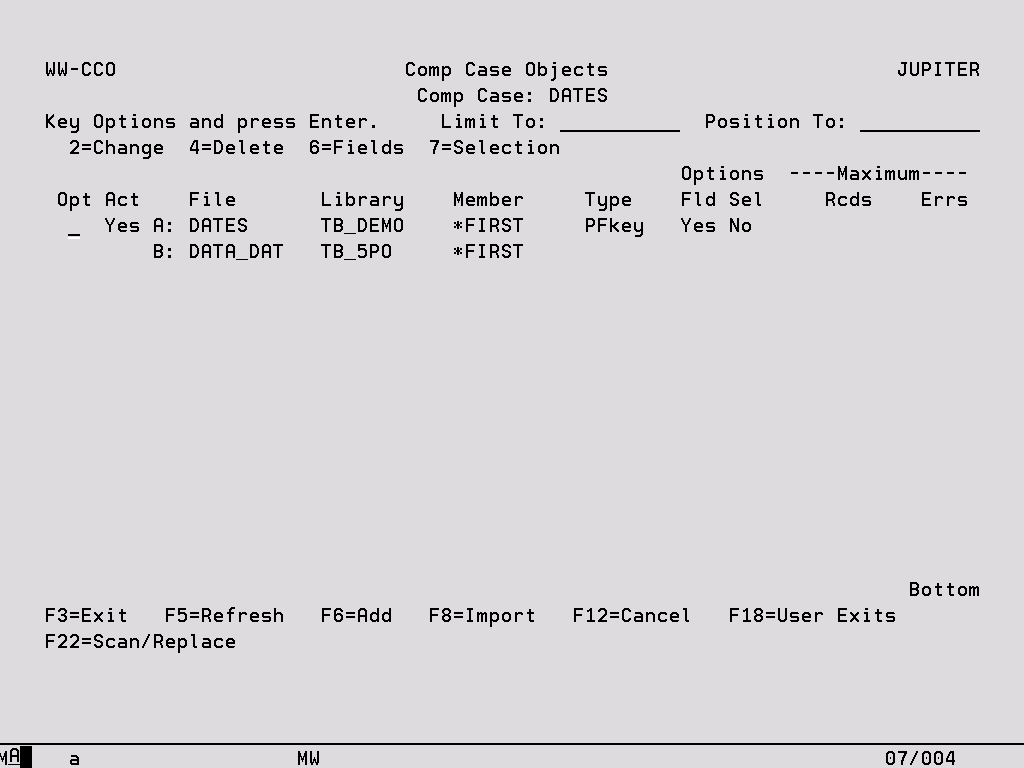
Limit To/Position To Both fields refer to File A when being used to subset the records on display.
Options:
2 – Change This option allows you to change the details of any file pair on the Object Details display.
4 – Delete This option allows you delete a file pair from the Comp Case. If chosen it takes immediate effect.
6 – Fields Define which fields in the two files are to be compared.
7 – Selection Select which records from the two files are to be included in the comparison.
Function Keys:
F5 – Refresh To refresh the display. The description of this function key will be highlighted whenever details of any Comp Case objects have been altered through Object Details.
F6 – Add To create a new Object in the Comp Case. (See the section on Object Details.)
F8 – Import Use this function if the files to be Compared are already defined in a Data Case or Warp Case. A separate window will then offer choices to enable this information to be imported into the Comp Case.
F18 – User Exits User Exit points can be defined which will be actioned during execution. For example, should you require a program or command to be executed after the files have been compared this can be added as a User Exit. See the System chapter for further information.
F22 – Scan/Replace Scan the Comp Case for a specific library name and replace with a new library.
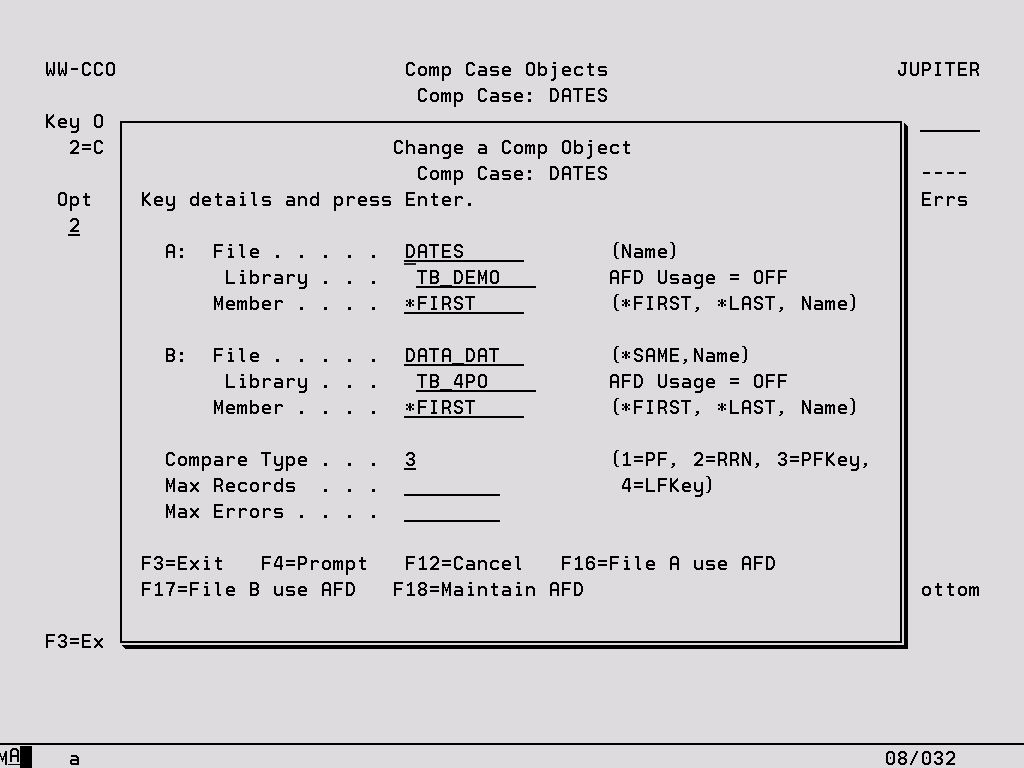
Object Details
This facility allows you to define the files to be compared, the method of comparison and the controlling factors. You will reach this screen from the Comp Case Objects display.
Entries:
The first three entries are repeated for each of the files in the comparison pair.
File Specify a valid physical or single format logical file that will be found in the Library. For File B this can be the special value of *SAME, in which case the File A file name will be used.
Library Specify a valid iSeries library name that currently exists.
Member Specify a member name, *FIRST, or *LAST. In the first instance the member name must exist. Entries in this field are ignored for data areas.
Compare Type Specify ‘1’ for comparison in RRN sequence but ignoring the RRNs, ‘2’ for comparison in RRN sequence cognizant of the RRNs, ‘3’ for a comparison in Physical File key sequence, and ‘4’ for a comparison in Logical File key sequence.
Maximum Records Specify the number of records read from both files in total, after which the comparison is to stop.
Maximum Errors Specify the maximum number of errors that are to be reported before the comparison is to stop. When processing very large files an entry may be wise in case the comparison has not been correctly defined and every record is reported as an error.
Function Keys:
F4 – Prompt To show a list of available entries for File, Library and Member.
F16/F17 – Use AFD Press F16 and F17 to toggle AFD usage on and off for File A and File B respectively. If no AFD exists for the file either for it’s specified library or for *LIBL, the AFD maintenance program will be called so that one can be created. AFD usage is ON by default for all new comparison objects where an appropriate AFD exists.
F18 – Maintain AFD Create or change Alternative File Descriptions.
Warnings
If a file to compare is changed, a warning window will pop-up if there are any comparison fields that will no longer be valid because they do not exist in the new file. If you accept the warnings these fields will be removed from the comparison.
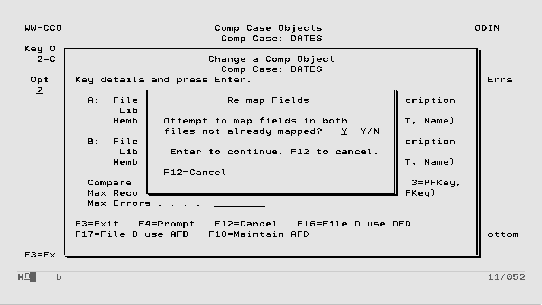
Re-Map Fields
If a file in the Compare Case is changed you will be given an opportunity, via a pop-up window, to map matching fields in the new file. Any unmatched fields in the Compare Case will attempt to be matched to fields in the new file.
Comparison Fields
This facility allows you to define which fields in each of the files are to be compared. You will reach this screen from Work With Comp Case Objects.
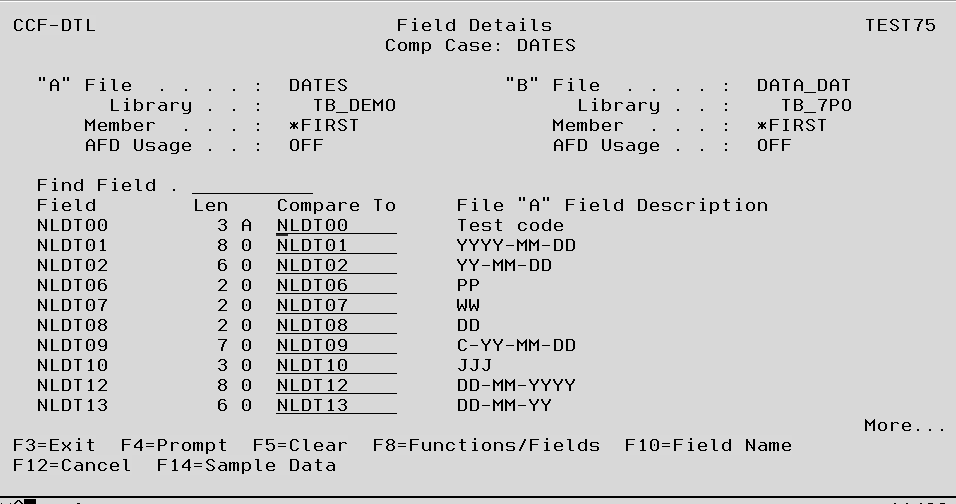
Find Field Enter in a field name and press enter to locate an existing field in the file.
Field All fields from the first (‘A’) file in the pair are listed, including any AFD fields.
Compare To For each listed field from File ‘A’, specify to which field in File ‘B’ it should be compared. The fields do not have to be of the same name, decimals places or even type, for example an alpha field can be compared to a packed field with two decimal places.
Function Keys:
F4 – Prompt To show a list of available fields in the Compare To (‘B’) File, including any AFD fields.
F5 – Clear Remove all ‘Compare To’ fields from the screen.
F8 – Functions/Fields Toggle the screen view to enter specific functions which can be applied to alpha comparison fields.
CHOP – Compare the data only up to the length of the shorter of the two fields. If data is present in the extra section of the longer field no difference will be reported.
UPPER – Convert fields to upper case before exercising the compare to ensure that case differences re not reported as errors.
An F4 prompt is available on this field.
F14 – Sample Data To display the actual data from the file for the selected field.
Record Selection
This facility allows you to specify which records from each of the files in the pair are to be included in the comparison. You will reach this screen from Work With Comp Case Objects.
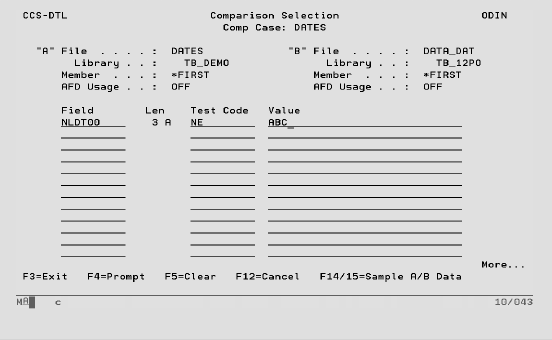
Up to 100 list entries can be made to select which records are to be included in the comparison. If any entries are made on a line, then the following validation must be satisfied.
Field This must be a valid Field Name that exists in both files in the pair, or an AFD field which has been defined for both files.
Test Code This must be a valid code that is currently supported for Comp Case record selection. Position the cursor on this field and press F4 to see a list of currently supported Test codes.
Value Key the value with which the Field is to be tested in combination with the Test Code. Quotation marks are not required for alphanumeric fields. A sign can be keyed in the first position for numeric fields. Date data type fields must be entered with separator characters.
Function Keys:
F4 – Prompt To show a list of the Common Fields in the file pair and available Test Codes.
F5 – Clear Remove all selections from the screen.
F14/15 – Sample A/B Data To display the actual data from the file for the selected field.
View a Comp Case
The following screen is displayed when option ‘5’ is keyed on the Work with Comp Cases screen. It lists all of the information that is updated using option ‘7’ for Comp Case Description.
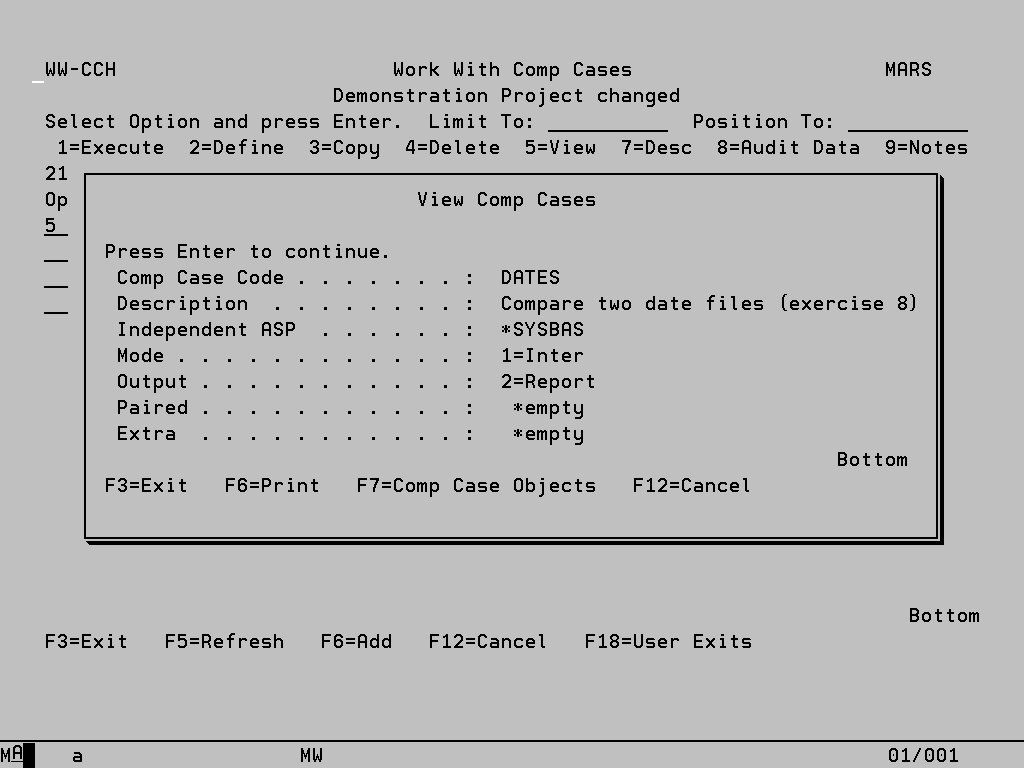
F7 – Comp Case Objects View the files present in the Comp Case and all associated details.