You will reach this Work With Plan Cases display either from the TestBench Main Menu or from Work With Projects. In the former case you will be prompted to select the Project in which the Plan Case resides.
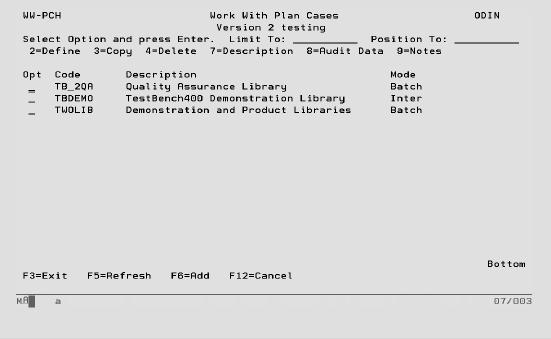
Limit To Key a character or characters to subset the display to records that have the same initial key values. Leave blank to have all records available via scrolling (page up/down). When entering a ‘Limit To’ value, this will always be used for the ‘Position To’ value in the first instance. Once the ‘Limit To’ range has been established on the screen a ‘Position To’ may also be specified. The last value keyed is stored for each user and will automatically be defaulted into this field when this panel is next accessed.
Position To This is a volatile field that will position records on the display starting with the characters keyed. Hence, this enables you to move quickly to the end of a long list and from there scroll up or down as required. If entered at the same time as the ‘Limit To’ field, ‘Position To’ will be ignored the next time the Enter key is pressed. Once the ‘Limit To’ has been established, ‘Position To’ can also be keyed. If the ‘Position To’ is outside the range of available records, the display will either start or end with the closest records.
Options:
2 – Define This option will take you through the Plan Case Build/Rebuild options to the Work With Plan Case Contents. Only one User can access a Plan Case in update mode at any one time. Subsequent Users will be forced into enquiry mode.
3 – Copy This option will allow you to copy the selected Plan Case and all its contents to another Plan Case and optionally, another Project.
4 – Delete This option will delete all information associated with a Plan Case. A warning is displayed before the delete process begins.
7 – Description This option will take you to Plan Case Maintenance (see below).
8 – Audit Data This option will show details of all amendments that have been made to the Plan Case.
9 – Notes This option will allow you to record notes for the Plan Case as a means of documentation.
Function Keys:
F6 – Add Allows you to add a new Plan Case via the Plan Case Maintenance (see below).
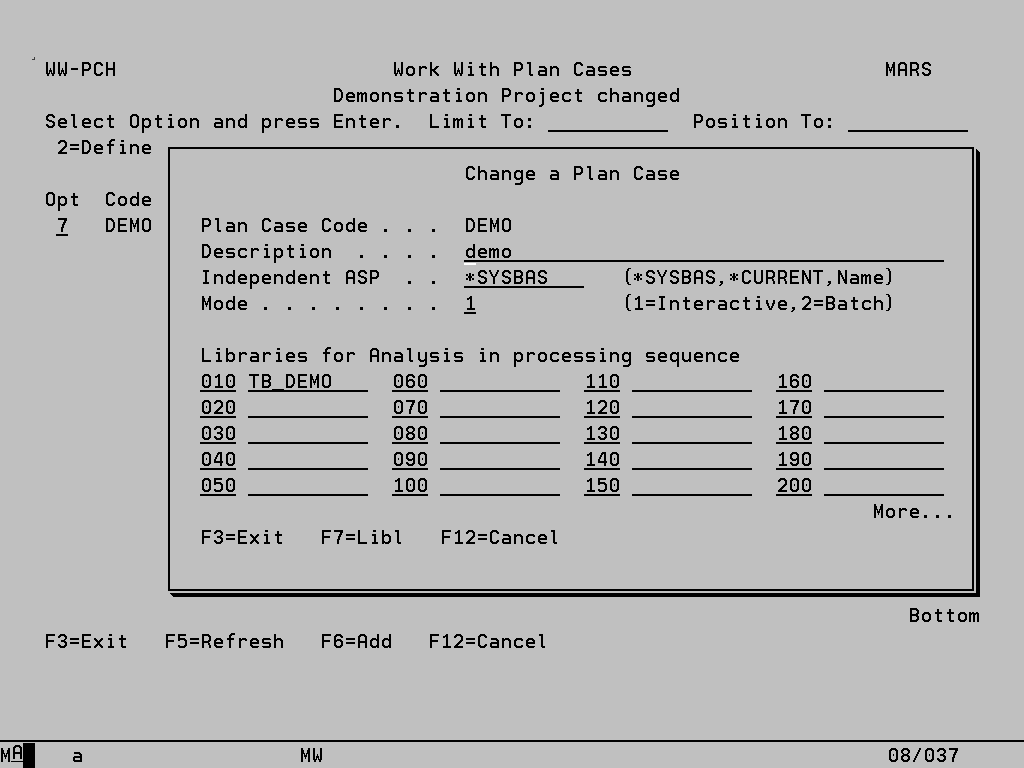
Plan Case Maintenance
Plan Cases are used to define the list of libraries that are to be analyzed. Use this facility to add or amend the core details associated with a Plan Case. You will reach this screen if you choose to add a new Plan Case or to maintain the description of an existing Plan Case. Both of these options are available from Work With Plan Cases.
Entries
The following are the rules for the fields that make up a Plan Case:
Plan Case Code In Add mode you should key an identifier for the Plan Case that must be unique within the current Project. This field cannot be altered in Change mode.
Description Key appropriate text to describe the current Plan Case.
Independent ASP If the objects being analysed reside on an Independent Auxiliary Storage Pool (IASP) other than the default of *SYSBAS, the name of the IASP can be specified here (or selected using F4). Alternatively select *CURRENT to enable whichever IASP is specified for the current job to be used. The Plan Case can then contain objects in libraries on the specified IASP and on *SYSBAS.
Mode This controls how the Plan Case build will be executed, ‘1’ for interactive execution, or ‘2’ for batch execution, and can be overridden when you select to build or re-build the information.
Libraries to Analyse List the libraries that contain the objects whose relationships require analysis. The sequence is important, as only the first iteration of an object is included in the Plan Case. So if Program ABC001R exists in more than one library in the list, the instance from the library where it first occurs will be included, while all other instances will be reported as duplicates.
Library List (via F7) This library list will be set before the analysis commences and every time that the Plan Case Contents are accessed. It is essential if programs within the Libraries to Analyse access objects outside their own library. If an appropriate library list is not set then the description of such objects will not be found, and the U/O information cannot be updated.
Plan Case Build/Rebuild
The following panel can be accessed with an option ‘2’ from Work with Plan Cases, or via the Plan_IT command (option 8 from the Main Menu). When the Plan Case Contents are accessed by a single User you will be prompted for a possible rebuild of the Plan. The number of days since the Plan was last built is shown at the head of the panel along with as many of the libraries that are attached to the Plan as can be displayed on a single line. All subsequent Users accessing the same Plan at the same time will be forced into enquiry mode and this screen is bypassed.
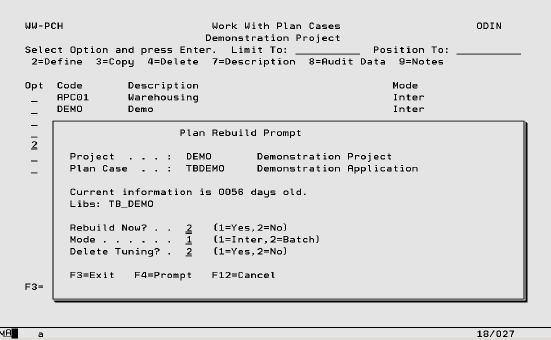
Entries
The following are the rules for the fields on this rebuild prompt:
Project Key in a valid Project Code or place the cursor in the field and press F4 to select from a list. If this screen is accessed by keying option ‘2’ on the Work with Plan Cases display, the Project Code and Description will be displayed but cannot be altered.
Plan Case Key in a valid Plan Case Code or place the cursor in the field and press F4 to select from a list. If this screen is accessed by keying option ‘2’ on the Work with Plan Cases display, the Plan Case Code and Description will be displayed but cannot be altered.
Rebuild Now? The valid entries are ‘1’ if rebuild is required and ‘2’ if not. Normally this panel will default to not requiring a rebuild but if the list of libraries to analyse has changed then the panel will suggest a rebuild.
Mode This controls how the rebuild will be executed, ‘1’ for interactive execution, or 2’ for batch execution. This field defaults to the value associated with the Plan Case and the overriding of this default can be prevented in System Values.
Delete Tuning This controls whether adjustments that have been manually made to a previous version of this application model are to be retained and re-applied once the objects currently in the list of libraries to analyse have been re-examined. The valid entries are ‘1’ if the tuning is to be deleted and ‘2’ if not. This field defaults to ‘2’ and the overriding of this default can be prevented in System Values.