To install the TestBench product, please refer to the supplied release notes and installation instructions in the TBENCH directory on the media image.
TestBench is started with the command TESTBENCH in the library TB_xPO (where x is the release number). This library does not have to be in the library list, simply enter the command qualified by the library name:-
TB_7PO/TESTBENCH (library/command)
The TestBench command displays the TestBench Main Menu, and adds the TestBench library into the product portion of the library list.
If your version has been installed into a different library, substitute this library name in the above command. For convenience, you may consider copying the TestBench command into a general purpose library such as QGPL.
The TestDrive and other PC components of TestBench operate on the PC and link with TestBench on the IBM i. The PC products are described in a separate user guide.
When TestBench is executed, your IBM i user profile is checked to ensure that it has sufficient authority to all the IBM i commands that are used by the various facilities. If any authority problems exist, they will be reported on the bottom line of the Main Menu the first time the TestBench command is executed in a job. To re-run the authority check take the appropriate option from the Utilities and Information Menu. For more information about the command authority requirements of TestBench, please refer to the help text for Utilities and System Values.
TestBench is delivered with a suite of example programs which are referred to in the installation guide. These are not required to run the product, but they are helpful in getting to know TestBench and when introducing new staff.
Overview of Main Menu Functions
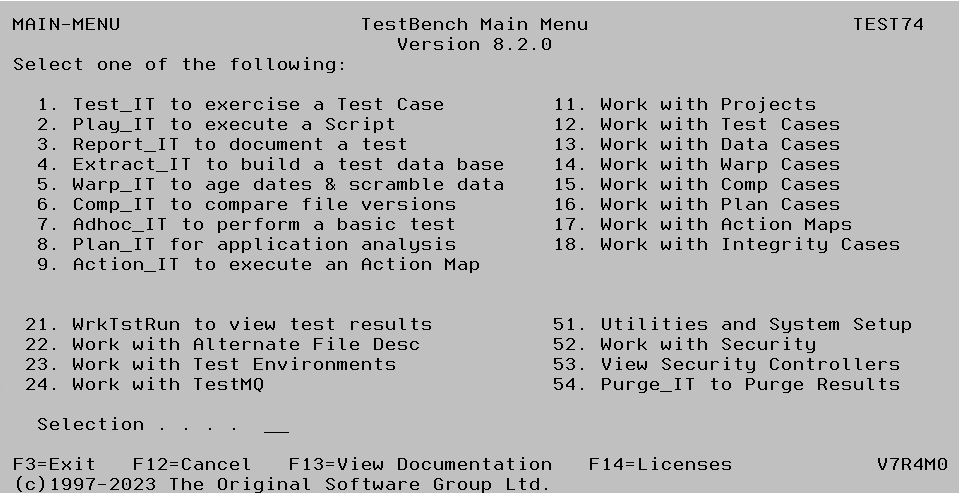
Description
- Test_IT
This is the command interface to Test Run Initiation where you can start the test of an application or part of it. Use this option if all test elements have been defined and you are ready to start the test. Tests are set up in Test Cases. - Play_IT
This is the command interface to replay a Script. Use this option if your Script has already been recorded using Native Record & Play, and all Script Options have been correctly set. - Report_IT
This is the command interface to request the creation of a Test Report. Test Reports can be for a single or all Test Cases and can be produced on hard copy, or exported to a PC file format. - Extract_IT
This is the command interface to the data extraction capability where a test database can be created from an intelligently linked sub-set of a live database. Use this option if your extraction has been defined and you are ready to run. See Data Cases on how to define rules for Extract_IT. - Warp_IT
This is the command interface to the date aging and data scrambling facilities. Use this option when all elements of a Warp Case have been created and you are ready to advance dates in your test data or protect sensitive information from developers or other users of the test system . - Comp_IT
This is the command interface to the File Comparison facility where two files can be compared at a field and record level to identify discrepancies. Use this option if your comparison has been defined and you are ready to run. Before running Comp_IT, set up the compare definition in a Compare Case. - Adhoc_IT
Use this option to access the developers workbench where many of the powerful facilities in TestBench can be immediately used without requiring further definition. - Plan_IT
This is the command interface to Plan Cases where an application model can be viewed or re-built. Use this option when all elements of a Plan Case have been created and you are ready to re-build or view it. - Action_IT
This is the command interface to execute an Action Map. These enable multiple TestBench Cases and commands to be run automatically one after the other. Before running Action_IT, set up the list of processes to run in an Action Map. - Work with Projects
Projects are used to control and group most of the elements of data in TestBench. This provides a convenient way to organise information. Plan Cases, Test Cases, Data Cases, Warp Cases and Compare Cases can all be copied from one Project to another if required. This option accesses the menu structure at the highest level.
Certain information is also defined at a Project level so that it is available to all cases within the Project. The two prime examples are Data Rules and User Exit Commands. Data Rules are used to check the validity of file updates and can be optionally defined at the Project level and will then apply to all Test Cases in the Project. User Exit Commands can be optionally defined for a Project and will then apply to all Test Cases in the Project as they execute. Data Rules and User Exits can also be set up for an individual Test Case. - Work with Test Cases
Test Cases contain the definition of the program or application that is to be tested. Use this option to access Test Cases directly, after selecting the appropriate Project, and gain access to all the facilities available at the Test Case level. - Work with Data Cases
Data Cases contain the details of the files and data areas from which information is to be extracted. Use this option to access Data Cases directly, after selecting the appropriate Project, and gain access to all the facilities available at the Data Case level. The copies of the files to be extracted according to the selection conditions defined in a Data Case are created by executing Extract_IT. - Work with Warp Cases
Warp Cases contain the details of the files which require their dates aged or their data scrambled. Use this option to access Warp Cases directly, after selecting the appropriate Project, and gain access to all the facilities available at the Warp Case level. - Work with Comp Cases
Comp Cases contain the details of the file pairs which require comparison. Use this option to access Comp Cases directly, after selecting the appropriate Project, and gain access to all the facilities available at the Comp Case level. - Work with Plan Cases
Plan Cases contain the application models which hold the relationships between the programs and files in a system. Use this option to access Plan Cases directly, after selecting the appropriate Project, and gain access to all the facilities available at the Plan Case level. - Work with Action Maps
Action Maps contain a list of tasks that are grouped together for convenience and can optionally be executed as a single unit. These tasks can include Plan, Data, Warp, Test and Comp Cases and also any IBM i commands. Use this option to access Action Maps directly, after selecting the appropriate Project, and gain access to all the facilities available at the Action Map level. - Work with Integrity Cases
Integrity Cases contain a list of Rules that define how the data within a set of files should behave. Rule failures are stored and can be viewed or reported at any time. Use this option to access Integrity Cases directly, after selecting the appropriate Project. - WrkTstRun to view test results
This is the command interface to review all the results from Test Runs that you personally initiated. Use this option to directly access your own work or use the menu structure to review all Test Run results across all users. - Work with Alternative File Descriptions
These are used to define additional fields for any physical file on your system. They are intended primarily for files without full external field descriptions, and for fields such as dates which are defined at the element level and need to be used as a single entity. Once defined, the use of AFD’s can be turned on or off in other areas of TestBench. - Work with Test Environments
A Test Environment is a method of managing a test database prior to and during testing. Checkpoints can be set which will enable TestBench to reset the database back to that point in time. When a Test Environment is used with a Test Case it provides file effects for the test results. Use this option to access Test Environments directly. - Work with TestMQ
Access the Work with Queue Managers display from where MQ message tracking can be activated. - Utilities & Information
Use this option to access facilities which apply across all Projects, such as System Values and System Test Sheets. You can also access the enhanced display of the IBM i Job Log from this sub-menu. - Work with Security
Use this option to define security settings for the TestBench product. See separate section for detailed information. - View Security Controllers
Display a list of all the Users who are Security Controllers for the TestBench product. See separate section for detailed information. - Purge_IT to Purge Results
Remove Test Runs, Data Runs, Warp Runs or Action Map Runs for a given date range. See separate System section for more information.
F13 – View Documentation
Provides a list of all the sections in which help can then be viewed. This documentation can also be viewed by pressing the Help key or the F1 key in TestBench.
NOTE: The F13 View Documentation and local help text will be superseded with our on-line help text.