You will reach this Work With Warp Cases display either from the Main Menu or from Work With Projects. In the former case you will be prompted to select the Project in which the Warp Cases reside.
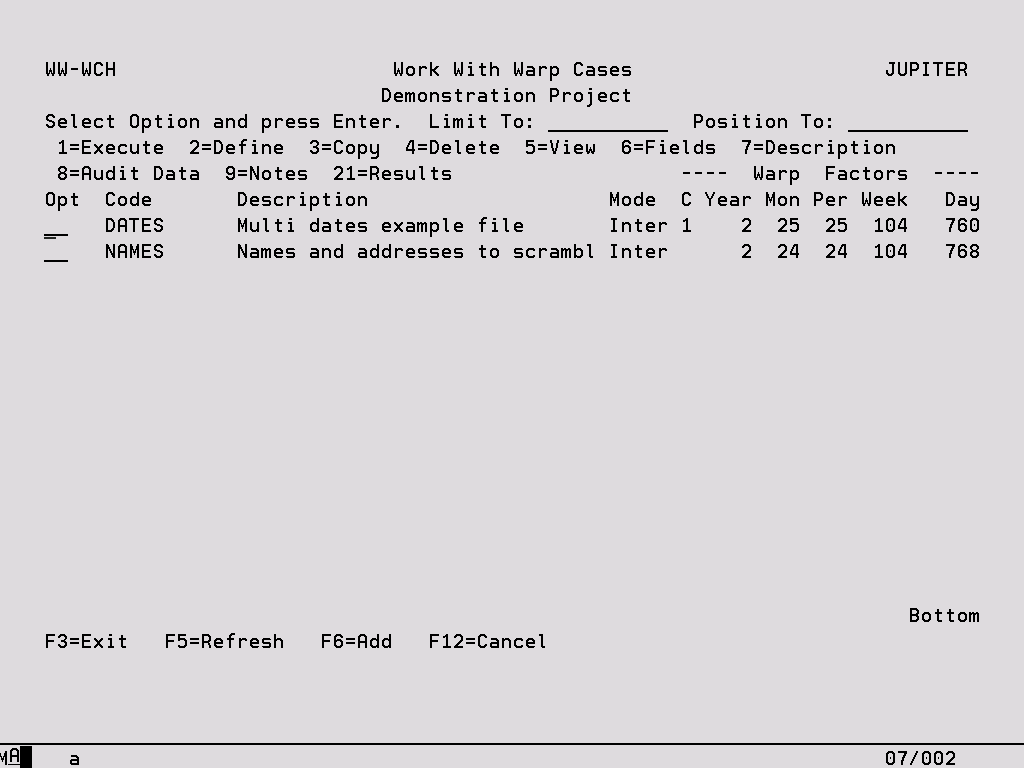
Limit To Key a character or characters to subset the display to records that have the same initial key values. Leave blank to have all records available via scrolling (or page up/down). When entering a ‘Limit To’ value, this will always be used for the ‘Position To’ value in the first instance. Once the ‘Limit To’ range has been established on the screen a ‘Position To’ may also be specified. The last value keyed is stored for each user and will automatically be defaulted into this field when the same panel is next accessed.
Position To This is a volatile field which will position records on the display starting with the characters keyed. Hence, this enables you to move quickly to the end of a long list and from there scroll up or down as required. If entered at the same time as the ‘Limit To’ field, ‘Position To’ will be ignored the next time the enter key is pressed. Once the ‘Limit To’ has been established, ‘Position to can also be keyed. If the ‘Position To’ is outside the range of available records, the display will either start or end with the closest records.
Options:
1 – Execute This option will take you to Warp Case Initiation (see specific section).
2 – Define This option will take you to Work With Warp Case Objects (see specific section).
3 – Copy This option will allow you to copy the selected Warp Case and all its contents to another Warp Case and optionally, another Project. If the target Warp Case already exists then the two can be merged.
4 – Delete This option will delete all information associated with a Warp Case. A warning is displayed before the delete process begins.
5 –View Display all of the information about a Warp Case that is maintained with options ‘2’ and ‘7’ (see specific section).
6 – Fields View and modify the Synchronized Scrambling Fields for this Warp Case (see specific section).
7 – Description This option will take you to Warp Case Maintenance (see specific section).
8 – Audit Data This option will show the details of all amendments to the Warp Case.
9 – Notes This option allows you to record notes for the Warp Case as a means of documentation.
21 – Results Access the Work With Warp Runs display from where the history of all previous executions of the Warp Case can be viewed.
Function Keys:
F6 – Add Allows you to add a new Warp Case via Warp Case Maintenance (see below).
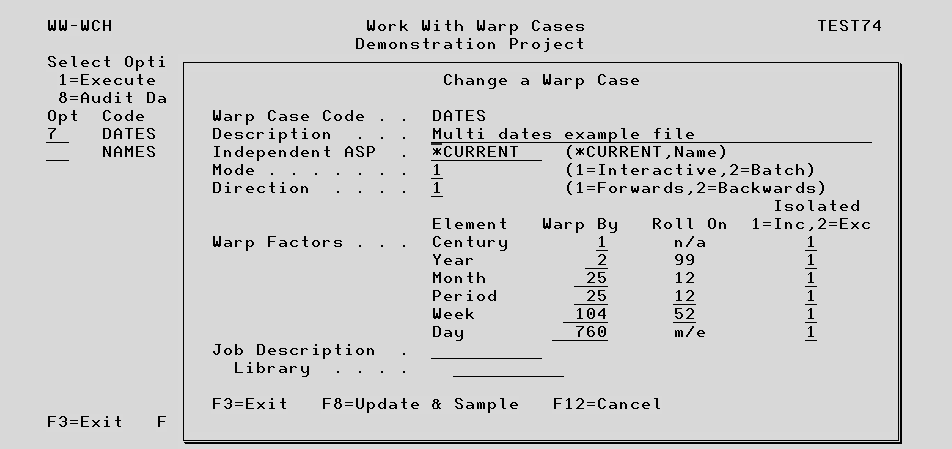
Warp Case Maintenance
Warp Cases are used to define the files which are to be date Warped or Scrambled, the fields in the files to be altered, and the Warp Factors to be applied to the dates. Use this facility to add or amend the basic details associated with a Warp Case. You will reach this screen if you choose to add a new Warp Case or change the description and aging factors of an existing Warp Case. Both of these options are available from Work With Warp Cases.
Entries:
The following are general entries which relate to Date Aging and Data Scrambling:
Warp Case Code In Add mode you should key an identifier for the Warp Case which must be unique within the current Project. This field cannot be altered in Change mode.
Description Key appropriate text to describe the current Warp Case.
Independent ASP If the files being warped reside on an Independent Auxiliary Storage Pool (IASP) other than the default of *SYSBAS, the name of the IASP can be specified here (or selected using F4). Alternatively select *CURRENT to enable whichever IASP is specified for the current job to be used. The Warp Case can then contain files in libraries on the specified IASP and on *SYSBAS.
Mode This controls how the Warp Case will be executed, ‘1’ for interactive execution or ‘2’ for batch execution.
The following entries of Direction and Warp Factors relate specifically to Date Aging and have no effect upon data scrambling:
Direction This controls whether the dates in the files will be advanced or retarded.
Warp Factors
Element These are the types of date information that can be aged. You include a particular element within date aging by keying a Warp By Factor.
Warp By Specify the value by which you wish a particular date element to be changed. The value is expressed in the units of the element. For example, you may wish to age the week element by 31 weeks.
Roll On Specify the highest allowed value for the element. You will note that certain of these entries are protected as the upper value is pre-determined. For example the upper allowed value for the month element will always be 12.
Isolated Allows you to specify the action to take if a date element exists in isolation, as opposed to being part of a larger date. Key ‘1’ to include isolated date elements and ‘2’ to exclude them. For example if your objective is to age dates by 1 year, for a Year/Month/Day field you might request aging by 365 days. Depending on leap years this might cause the Month and Day portions to alter by 1 day. However if the same information is contained in three separate fields, you would specify that the Year element is to age by 1 year and that isolated days and Months should be ignored.
Job Description This option applies to both date warping and data scrambling. For batch jobs, the job description and the associated library location can be specified. If left blank, the user profile or the systems values will dictate which job description is utilised.
Function Keys:
F8 – Update & Sample This will first update the Warp Case description and aging factors, followed by accessing the Date Sampling facility (see later in this section) where you can model the effects of the aging factors on different date formats and data.
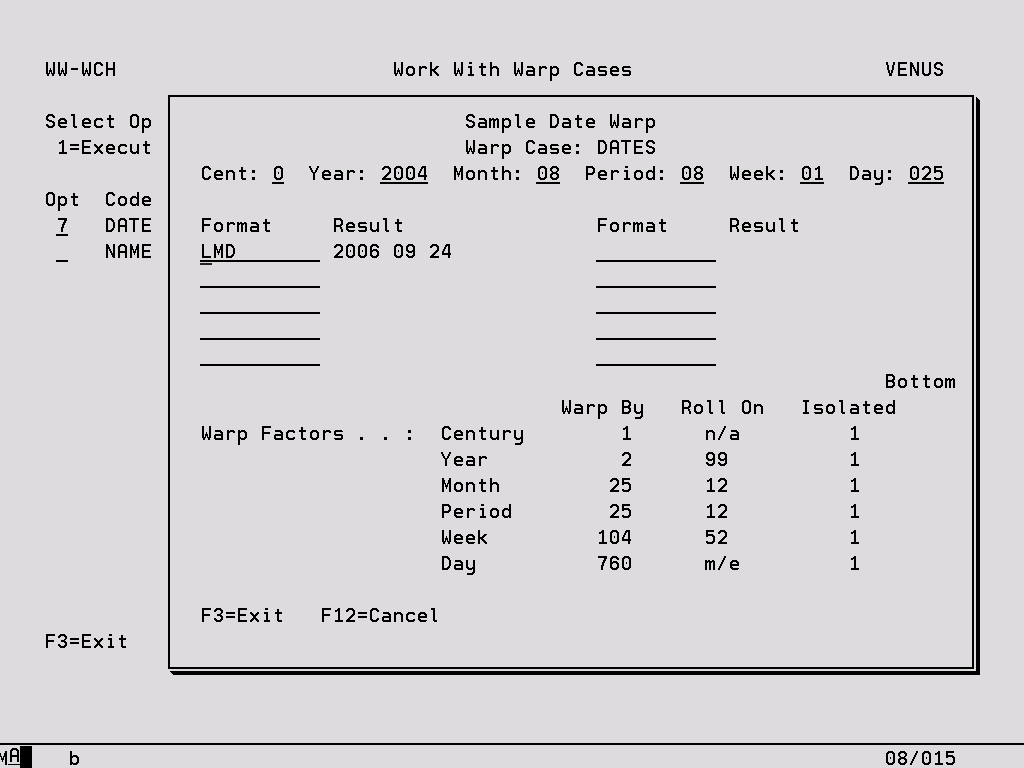
Date Sampling
The set up of Date Warping includes this facility with which you can model the effects of your chosen aging factors upon different date formats and data. You will reach this screen from Warp Case Maintenance or Warp Case Initiation.
Entries:
Date Fields These comprise the Century, Year, Month, Period, Week and Day fields. Use these to specify the date at which you want your date aging model to commence. No validation is performed on these entries to allow the effect on invalid data to also be modeled. Note that the Day entry comprises three positions to allow high initial Julian dates to be set. The day field is used as a day of the month for field type D and at the same time as the Julian date for field type J. This means that if you use this facility to calculate the effects of days of the month and Julian dates simultaneously, the resulting calculated Julian date will not be equivalent to the day of the month calculated, except in January.
Format Specify the format of date information that is to be aged using any of the valid code combinations. These codes can be viewed using F4-Prompt. Remember that valid combinations can be keyed in any sequence, so DMY, DYM, MDY, MYD, YMD and YDM are all valid.