Every database view supports a context menu available on right click, the contents of which are controlled by the application design within the Admin area and the permissions of the current user. These options are also all available from the toolbar.
Please note that when a view containing an extended entity is displayed, all right click options will operate on the base entity, ie. the entity which is actually being extended.
Add: Add a new entity of the current type. This could be either the standard creation or via a workflow, see the following section for more information. If you are not viewing the entity from its parent, and a parent selection is required, a dialog will be presented so that one can be selected. This option is not available this is a root entity and you have multiple instances open or if the entity is workflowed and you are not authorised to any of the start transitions.
Create: Add a new entity as a child of the current type. This could be either the standard creation or via a workflow, see the following section for more information.
Edit: Edit the currently selected item.
Open: This option is available instead of ‘Edit’ if the user only has Read permissions to the entity. The Entity Editor is displayed but in Read only mode.
Delete: Remove the currently selected item. Please note that the item will still spear in the grid but it will be crossed through. Only once the grid is refreshed will it actually disappear from view.
Link: If this entity has a ‘linked with’ relationship with another entity, selecting this option will enable one or more records for the other entity to be selected and a link created between them. The following screen is displayed. Double click an item in the grid to view its child assets or alternatively click on an entity in the bar at the top to display a full list. Data will be presented for each entity via its default view, however grid columns can be sorted and manipulated in the normal fashion.
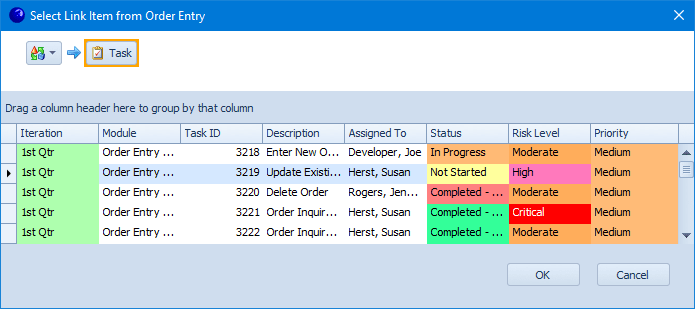
If you need to access items from another instance, use the drop down list in the first box in the crumbar. Once you have isolated the items for linking, select one or more and then click the OK button.
Unlink: If this entity has a ‘linked with’ relationship with another entity, selecting this option will remove the link between the two.
Bulk Assign: This option provides the ability to update the values for property types of boolean, single value select, multi-value select, dependent select, resource, single line text, multi line text, dates, duration, integer and decimal. You can also bulk assign items which are enrolled in workflow, however if you need to change the workflowed property itself then all selections must have the same current value. Pre-select all rows in the grid that you wish to change by highlighting them and then take this option to display a list of all valid properties that can be modified.
If a multi value select is chosen then it will clear all the current values and replace them with the single new selected value.
Change: Similar to bulk assign, this option provides the ability to quickly update the values for property types of single value select only. Pre-select all rows in the grid that you wish to change by highlighting them and then take this option to display a list of all valid properties that can be modified.
View: Provides the option to open a new database view of the top level entities associated with the current item via an immediate or indirect link. For example, if you right click a folder you might expect to be able to view tasks or defects. If tasks are linked to requirements, right clicking a requirement will show all linked tasks. Each of the following sections is only present if any of those types of relationships exist.
The first section shows only directly related items, ie. those which are direct children, grandchildren, great-grandchildren etc.
The second section shows any direct links to this entity. Standard links (created via the ‘Link’ option) have a red overlay on the icon. Softlinks have a green overlay. The columns on the two entities which form the link must be defined in Admin, then when viewing one entity from the other, all records are listed where these columns contain the same data. The most structured way to use this would be for each entity to have a Unique Id column and for this to be used in the relationship so that links cannot be accidentally broken. These types of relationship also appear on the Application Map. Finally, Entity Select relationships have a blue overlay. These occur where the master entity has an Entity Select property defined so that records from another entity can be chosen. For example, if you create Incident records and on each one you select the Customer to which the Incident relates, the Customer being another entity in your model, then you can view Incidents from your Customer records and vice versa. These types of relationship do not appear on the Application Map.
The third section shows all items that have a linked relationship to this entity via any path no matter how convoluted. The restrictions on the latter are that Qualify stops tracing the path once an external entity is reached and once two links have been followed.
Execute Test: This option is available provided a ‘Test Execution Plugin’ has been specified on the Plugins tab for the entity in Admin. It initiates a manual test of the selected item and depending on the plugin either launches TestDrive-Assist (if it is not already active), TestDrive-UAT or a manual result window. Optionally Test Items will be created from the child entity specified as being the Executable Entity also on the Plugins tab in Admin. This could be the system defined Steps entity if one exists, however they could also be copied from another tab on the entity being executed or from another entity which has a direct relationship with this one. At the end of the test the results can be saved back to the item being executed. See the Qualify Admin and TestDrive chapters for more information.
Clipboard actions: These are described in a separate section later in this user guide.
Import/Export: The Import/Export function allows assets to be transferred between databases and supports the transfer of Worklists, Playlists, Scripts, Variable Data, Option Sets and Application Definitions. Only Worklists, Playlists and Scripts will have the export option available, the process will automatically include any required child elements. The import option is be available from any entity that has a child of any of the asset types that can be imported.