Introduction
This software enables you to extract a linked subset of data from a larger database. The extraction is based on records and members in Physical Files as well as Data Areas. Any Logical Files which existed in the original database can be automatically recreated in the new version. In addition, the extracted data can be modified, for example to ensure that it is suitable for the testing about to take place. The data extracted can also be deleted from the original files. Example applications for this technology are:-
• Test data creation (e.g. for use with TestBench)
• Data for training
• Management information extraction
• Archiving old data
• Correcting invalid data
• Data warehousing
• Organisation restructuring
The relationships and the selection criteria required to perform the extraction along with any update criteria are defined as a ‘Data Case’.
Data Cases
A Data Case contains the following information:-
• Details of the objects which are the source of the data to be extracted (includes files and data areas)
• How one file is related to or joined to another (based on files)
• Rules for selecting records from files
• Rules for updating fields in the files
• How the extract is to be performed
• Where the extracted copy is to be placed
A ‘linked subset’ is possible through the recognition of the relationships that exist between files within a database. We express this relationship as ‘Based On’ in the way that an Order Line file is based on the Order Header file. These Based On relationships can be extended to any number of levels, so the previous example can be extended to define that the Line Shipment Details file is based on the Order Line file. The Auto Analyse feature will in most cases construct these relationships automatically. Once the definition of the relationships has been completed you will have a ‘tree’ structure with a master file at the head of each branch. It is also possible to define a transaction led extraction by specifying, for example, the Order Header file as being based on the Order Line file.
Selection criteria can be set for any file being extracted or updated in the Data Case, although the majority of selections for data extraction are usually specified against the top level files. For example you may choose to extract all the customers who are based in China and let the system automatically extract linked records from the Accounts, Order Header, Order Lines and Line Shipment Details files.
The Data Case holds definitions for all data areas and files together with their relationships so that the extraction process can be scheduled and performed through a single request whenever required. The command ‘Extract_IT’ processes the information held in a Data Case and performs the required functions – extraction, archive, data alteration or extraction and alteration. It may be run interactively or in batch.
When executing a Data Case, extracted data can be added to an existing set of files, or the new selection can replace any data already extracted. The add function means you can create multiple extractions that select sections of your data, and merge these selections with previous extractions.
Summary Instructions for Performing a New Extraction
1. Use Work With Data Cases to create a description of a Data Case which will contain a list of the objects to be Extracted from and where the output should be placed (the Target library), and/or the list of objects to be updated.
2. Use option 2 to define the data case contents. If this is a new Data Case, use F9 Auto Analyse to examine the relationships of files in a library, using either Physical Key structures or Logical File keys.
3. If necessary, adjust the structure that has been determined from the files and move lower level files to more suitable ‘Based On’ files until you are happy with the definition of the structure. This is a one off task for each application.
4. You can alter the fields that define the link between two files if you want to. For example, if two files have been joined by Order Number, you could change this join to another field common to both files, perhaps Picking List Number.
5. For Data Cases involving the extraction of data (Extract, Archive or Extract & Alter type cases), key in selection rules against the level 1 files (on which all the others are to be based) using and/or relationships to extract suitable sections of the level 1 files.
6. If required, add data selections for lower level files in the hierarchy to further reduce the data extracted.
7. For Data Cases involving the alteration of data (Alter or Extract & Alter type cases), specify the fields to be updated and optionally the conditions under which these updates should occur.
8. Execute the Data Case to perform the relevant actions – create the extracted files in the Target libraries, delete extracted records from the original files, or update selected fields with specified values. Logical Files that exist over the selected Physicals, triggers and constraints will optionally be rebuilt for files in the Target libraries.
9. Check the contents of the Target libraries and adjust the selection or update rules if the volume or nature of the data is not suitable. You can use the add function to run a further Data Case and add to the records already there.
10. Remember, you can copy one Data Case to create a new one if you require a variation but want to keep the original.
General Rules for Data Case Objects
1. Only physical files, source files and data areas can be included in a Data Case. This is not a restriction in any real sense as selection criteria and field linking will achieve anything that might be provided by a logical file and any logical files can be recreated over the new copies.
2. In Change mode, all details can be altered except for the Object Name and Object Type. An important facility is the ability to change a top level file to a Based On file and vice versa, since this allows any incorrect assumptions made by Auto-analyser to be easily amended.
3. The Object and Member (if specified) must exist when the Object is added or maintained.
4. Prompting via F4 is supported for Object, Library, Member (where relevant) and Based On File.
Data Areas
To include a data area in a Data Case, specify the Data Area Name and Library location. No other values should be keyed and the Include By setting will be ignored. No further action is required.
Selection Rules
When the header information has been correctly entered you will have the opportunity to specify selection rules for the records in the file being extracted or updated. These are optional entries. Any selection record comprises three parts, Field, Test and Value. Individual selection rules for a file can be linked together by either a logical AND or a logical OR. If no logical operator is specified the default is a logical AND. A maximum of 100 selection lines can be keyed.
Field This must be a field which exists in the Selection file or on an Alternative File Description being used for the file. Alphanumeric, packed, signed, Date, Time or Timestamp type fields are currently supported for selection rules. F4 to prompt is supported.
Operator CT (Contains), EQ (Equals), GE (Greater Than or Equals), GT (Greater Than), LE (Less Than or Equals), LT (Less Than), NE (Not Equals), LIST, NLIST, ISNULL, NOTNULL, RANGE and NRANGE are all supported.
Value If a constant value has been keyed and Super SQL is not being used then this must respect the length, decimal positions and type of the Field which has been specified. For numeric fields the sign (if specified) must be keyed in the first position of the Value. Unlike IBM products there is no need to key apostrophes to define the limits of an alphanumeric string. Date and Time type fields must be keyed with their separator characters. If the Field and Operator columns have been left blank the complete SQL expression can be specified in the Value column using the Extractor Super SQL syntax. Alternatively the field Value can be expressed using this method. See later section for details.
Based On Files
The file Name, Library, and Member should be keyed with the Include By set to ‘2’. If the Member Name is left blank it will default to *FIRST. The Based On File must be set to a file that is already defined in the Data Case.
Field Links
You must define the way in which the current file and the file on which it is based, are related. You can define as many ‘pairs’ of fields as are required to define the relationship between the files. Technically these are ‘join’ criteria. F4 prompting is supported for both files.
Any field from this File may be matched to any field in the Based On file as long as they are the same type. E.g. Alphanumeric, Date, Time. In addition it is possible to link fields which are signed and packed types.
It should be noted that you are not limited to using fields that comprise existing access paths, however if you can base your links on existing access paths there should be a performance benefit.
F16 Match Keys will examine the keys in the physical file access path and will automatically generate links based on key fields which match in name, length and type.
Update Rules
For Alter or Extract & Alter type Data Cases you may specify which fields in the file will be updated and their corresponding new values. These are optional entries. An update record comprises two parts, Field and Value. A maximum of 100 update lines can be keyed.
Field If keyed this must be a field which exists in the file. Alphanumeric, packed, signed, Date or Time type fields are currently supported. F4 to prompt is supported.
Value If a constant value has been keyed and Super SQL is not being used then this must respect the length, decimal positions and type of the Field which has been specified. For numeric fields the sign (if specified) must be keyed in the first position of the Value. Unlike IBM products there is no need to key apostrophes to define the limits of an alphanumeric string. Date and Time type fields must be keyed with their separator characters. Alternatively the Value to which the field will be updated can be expressed using the Extractor Super SQL syntax. See later section.
Sample Data
F14 with the cursor positioned in either the This File or Based On column on a line that specifies a valid field name will display the data from the relevant file.
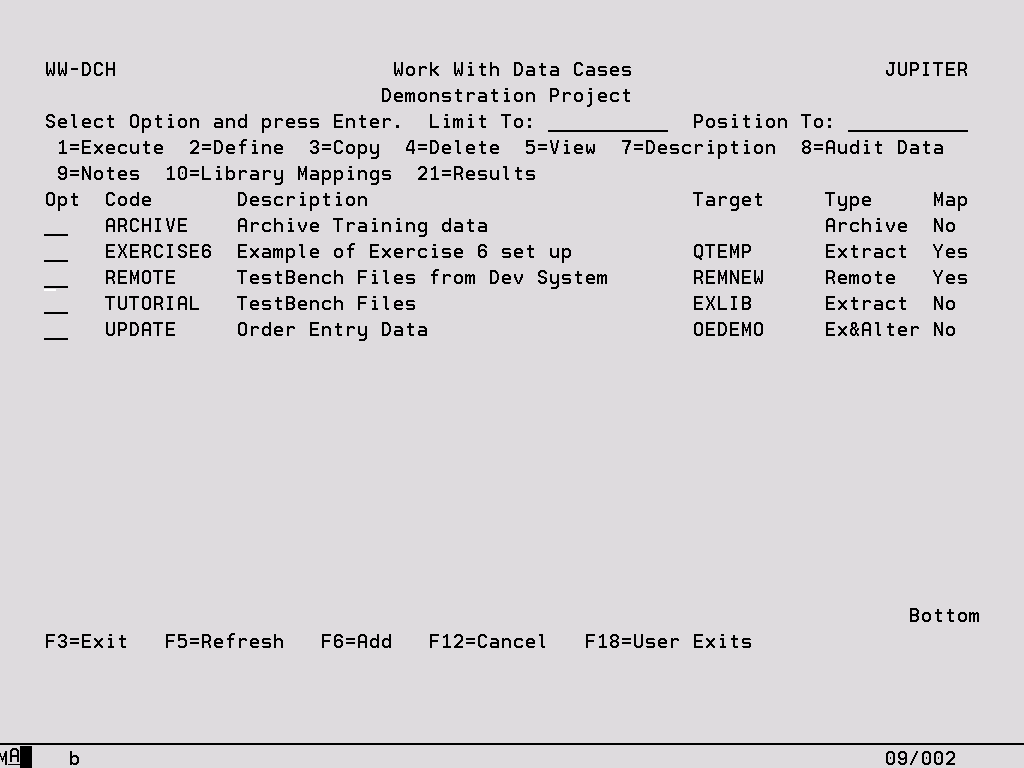
Work With Data Cases – Details
You can reach this Work With Data Cases display either from the Main Menu or from Work With Projects. In the former case you will be prompted to select the Project in which the Data Cases reside.
Limit To Key a character or characters to subset the display to records that have the same initial key values. Leave blank to have all records available via scrolling (or page up/down). When entering a ‘Limit To’ value, this will always be used for the ‘Position To’ value in the first instance. Once the ‘Limit To’ range has been established on the screen a ‘Position To’ may also be specified. The last value keyed is stored for each user and will automatically be defaulted into this field when the same panel is next accessed.
Position To This is a volatile field which will position records on the display starting with the characters keyed. Hence, this enables you to move quickly to the end of a long list and from there scroll up or down as required. If entered at the same time as the ‘Limit To’ field, ‘Position To’ will be ignored the next time the enter key is pressed. Once the ‘Limit To’ has been established, ‘Position to can also be keyed. If the ‘Position To’ is outside the range of available records, the display will either start or end with the closest records.
Options
1 – Execute Go to Data Case Initiation (see specific section).
2 – Define Go to Work With Data Case Objects (see specific sections).
3 – Copy Copy the selected Data Case and all its contents to another Data Case and optionally, another Project. Two Data Cases can also be merged using this option.
4 – Delete Delete all information associated with a Data Case. A warning is displayed before the delete process begins.
5 – View View all of the details of the Data Case which can be maintained using options ‘2’ and ‘7’ from Work with Data Cases. This option is not valid for Remote extracts.
7 – Description Go to Data Case Maintenance (see specific section).
8 – Audit Data Show the details of every occasion on which the Data Case was maintained.
9 – Notes Display or record notes for the Data Case as a means of documentation. If there are Notes set up against a Data Case the display shows a ‘¶’ to the left of the Data Case code.
10 – Library Mappings Override the Target Library defined to the Data Case for the extracted objects by specifying source and target library mappings here. If any mappings exist, a ‘Yes’ is shown in the ‘Map’ column on the Work With Data Cases display. See later section for more information.
21 – Results View details about every execution of the Data Case, including files and numbers of records extracted and elapsed time of the extract.
Function Keys
F6 – Add Add a new Data Case via Data Case Maintenance (see below).
F18 – User Exits User Exit points can be defined which will be actioned during extraction. For example, should you require a program or command to be executed after the new data has been extracted this can be added as a User Exit. See the System chapter for further information.
Data Case Description
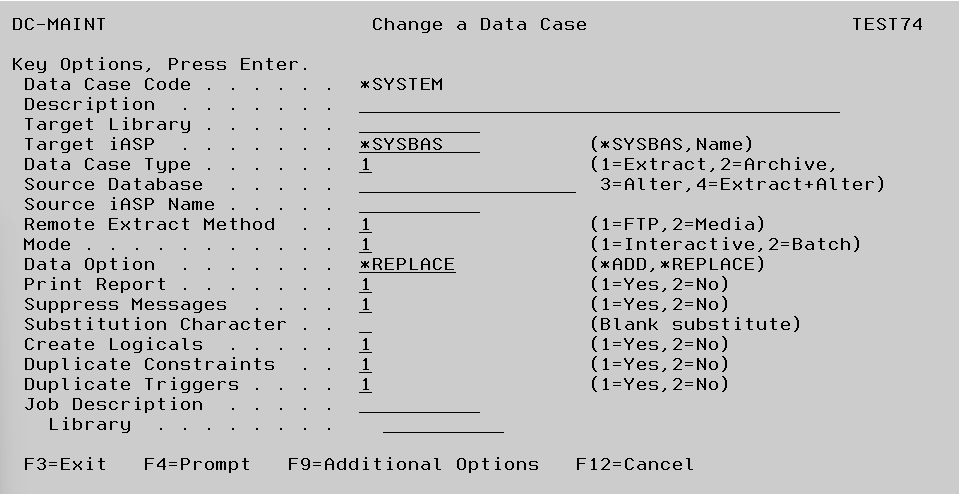
This facility is used to add or amend the basic details associated with a Data Case. You will reach this screen if you choose to add a new Data Case or change the description of an existing Data Case. Both of these options are available from Work With Data Cases.
Entries
Data Case Code In Add mode you should key an identifier for the Data Case which must be unique within the current Project. This field cannot be altered in Change mode.
Description Key appropriate text to describe the current Data Case.
Target Library Key the name of the library in which the results of the extraction process are to be placed. If specified, this must be a valid OS/400 object name and if it does not currently exist as a library, the library will be created when the Data Case is executed. This library can be overridden by using the Library Mappings, see later section for more information.
Target iASP By default, the target library and files being extracted will reside in *SYSBAS. If an iASP name is specified, the target library and the extracted files will be placed into the iASP.
See section System, subsection iASP Support for more information.
Data Case Type Determines which actions will be performed when the Data Case is executed. Option ‘1’ means that data will be extracted into the target library, while in addition option ‘2’ means that those records which were extracted will be deleted from the original files. Option ‘3’ performs no extraction, but updates the data in the original files, and option ‘4’ extracts data into the target library and updates the extracted data. Options ‘2’, ‘3’ and ‘4’ can only be used if you are running TestBench or Extractor Advanced Edition. It is possible to restrict access to specific Data Case types using TestBench security.
Source Database The name of the Relational Database to extract from if using the remote extraction functionality. The source database is the name specified in the Relational Database Directory (WRKRDBDIRE). It can be up to 18 characters long. It is used by TestBench when making a connection to a database.
See separate section Remote Extraction for more information. Remote extraction can only be used if you are running the same version of TestBench and/or Extractor on the local and the remote system(s).
It is possible to restrict access to remote Data Cases using TestBench security.
Source iASP Name This field will default to blank which is *SYSBAS. If an iASP name is specified, TestBench will retrieve the files from source library from the specified iASP.
The Source iASP name is the ASP device description name which is up to 10 characters.
TestBanch uses this value for certain commands such as CRTLIB
See section System, subsection iASP Support for more information.
Remote Extract Method
Option 1 fully automates the extraction process. The data is extracted on the remote system and FTP used to transfer it to the local system where it is then restored. Option 2 requires manual intervention to move the extracted data from the remote to the local system. Once the data has been extracted on the remote system the Data Run adopts a status of ‘MedReady’ and a message can be sent to a designated message queue. The name of the library containing the data can be found by keying an option 5 for details against the Run. Once this library has been restored to the local system, option 13 against the Data Run resumes the extract process and moves the data to the target library. Some commands and APIs are available to assist in automating this process, see later section for more information.
Mode This controls how the Data Case will be executed, ‘1’ for interactive execution or ‘2’ for batch execution.
Data Option *REPLACE will clear members in the files in the target library if they exist before populating them with the results of the new selection. *ADD will leave the data in the target files and then add any additional records that meet the selection rules. If the Physical File is keyed or a uniquely keyed Logical File exists, duplicate key records will not be added.
Print Report Key 1 to print an optional report showing details of the Data Case execution. For cases involving data extraction this will include the number of records originally in each file and the number now in the target library. This includes an estimate of the disk space occupied by the new versions of the files. The report for Data Cases where files have been updated will show the number of records which were altered.
There is also a section at the end of the report which provides a summary of the above information for files that are present in the Data Case more than once.
Suppress messages When the Data Case is executing status messages will be sent to the display to advise on progress. These may be suppressed with this option.
Substitution Character When entering certain types of selection (LIST, NLIST, RANGE and NRANGE) a blank character will signify the start of a new element. If the data being entered contains an embedded blank you may specify a character here which can be included in the data element but will be substituted with a blank during extraction.
If using Super SQL syntax, a substitution character must always be used to represent a blank character within a value.
Create Logicals Option ‘1’ causes logical files which are built over the physical files in the original library to be rebuilt in the target library for Data Cases involving data extraction. If option ‘2’ is keyed the logicals will not be rebuilt.
Duplicate Constraints For files that are not currently present in the target library, this flag will dictate whether any constraints on the original files will be copied along with the file into the target library. When constraints are duplicated the state of the constraint (*ENABLED/*DISABLED) is maintained.
Duplicate Triggers For files that are not currently present in the target library, this flag will dictate whether any triggers on the original files will be copied along with the file into the target library. When triggers are duplicated the state of the trigger (*ENABLED/*DISABLED) is maintained.
For files that are already present in the target library all the existing triggers and constraints are temporarily disabled while the data is copied and are reinstated after the data transfer is complete. This prevents any triggers from firing while the file is updated.
As of version 8.0.0, there are two warnings included on the Data Case error report.
It will list any files that have *INOPERATIVE triggers and it will also list any triggers for which the trigger program does not exist.
Job Description If entered this job description will be used when submitting Data Extracts to batch.
Press F9 to access the Additional Options below.
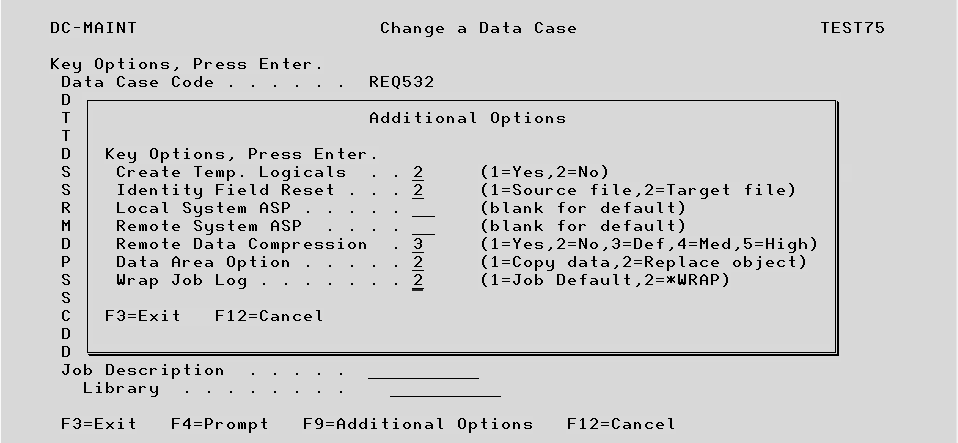
Create Temp. Logicals For *ADD type extractions and also for *REPLACE extractions when a file appears in a Data Case more than once, the extracted data is placed in a temporary library prior to being copied into the target library. Option ‘1’ causes logical files which are built over the physical files in the original library to be re-built in the temporary library. If option ‘2’ is keyed the logicals will not be re-built. Performance may be improved with option ‘1’.
Identity Field Reset When files are created using SQL it is possible to add an identity field, a sequential record number updated by the operating system. When extracting data for these files, an option ‘1’ in this field will reset the next identity field number to be one number higher than the source file. For example, if the source file contains 100 records, the next number will be 101, even if only 5 records were extracted. Option ‘2’ would reset the number to 6, one higher than the target file sequence.
Local System ASP If the files are to be extracted to a new library (which has not already been created), you can specify the system Auxiliary Storage Pool (ASP) number in which the new library should be created. If left blank, the default system value will be used (normally ‘1’). In the case of files which are being extracted and the objects do not already exist in the target library, and the files refer to Data Dictionary members created with the system facility IDDU, beware that these files cannot be created in a different ASP from the IDDU members and you will need to ensure the ASP value is the same as the files being extracted from.
Remote System ASP See the above for ASP Local System. This value is used to specify an ASP for the temporary library on the remote system, prior to the data being retrieved to the local system. This is normally only required if the remote files use IDDU Data Dictionary members.
Remote Data Compression This defines the level of data compression that will be used when the data is saved into a save file on the remote machine. The higher the compression method used, the longer the save will take but the smaller the save file will be for transfer to the local machine.
Data Area Option Option 1 means that if the data area already exists in the target library, the data will be replaced but the object will not, so any authority settings will remain intact. Option 2 will delete and replace the entire object.
Wrap Job Log With very large Data Cases, the user can potentially run into the scenario where the job log becomes full and the data extraction process halts.
TestBench 8.3.0 now provides an option to wrap the job log messages.
Option 1 will take the Job Default value for the job message queue full action parameter (JOBMSGQFL).
Option 2 will change the value for the JOBMSGQFL parameter for the current job to *WRAP.
This option ensures the current job is changed to *WRAP for job log messages.
Data Case Templates
Data Case templates are used to create default settings for any new Data Case to be created.

This screen can be accessed from the System Menus in TestBench or the Extractor Main Menu. Use this screen to set up the normal initial values for a Data Case to help all new Data Cases be created more easily to this standard. When creating a Data Case, the values entered where will appear by default, but the entries can be changed.
See the previous section Data Case Description for details on this screen.
Library Mappings
The following screen is accessed using option ‘10’ from the Work With Data Cases display. It allows the target library specified on the Data Case Description to be overridden, enabling objects which originate from multiple target libraries to remain in separate libraries once extracted. The target library can also be specified at the individual object level on the Object Details screen within the Data Case. Any library specified at the object level takes precedence over both the Data Case target library and the library mappings.
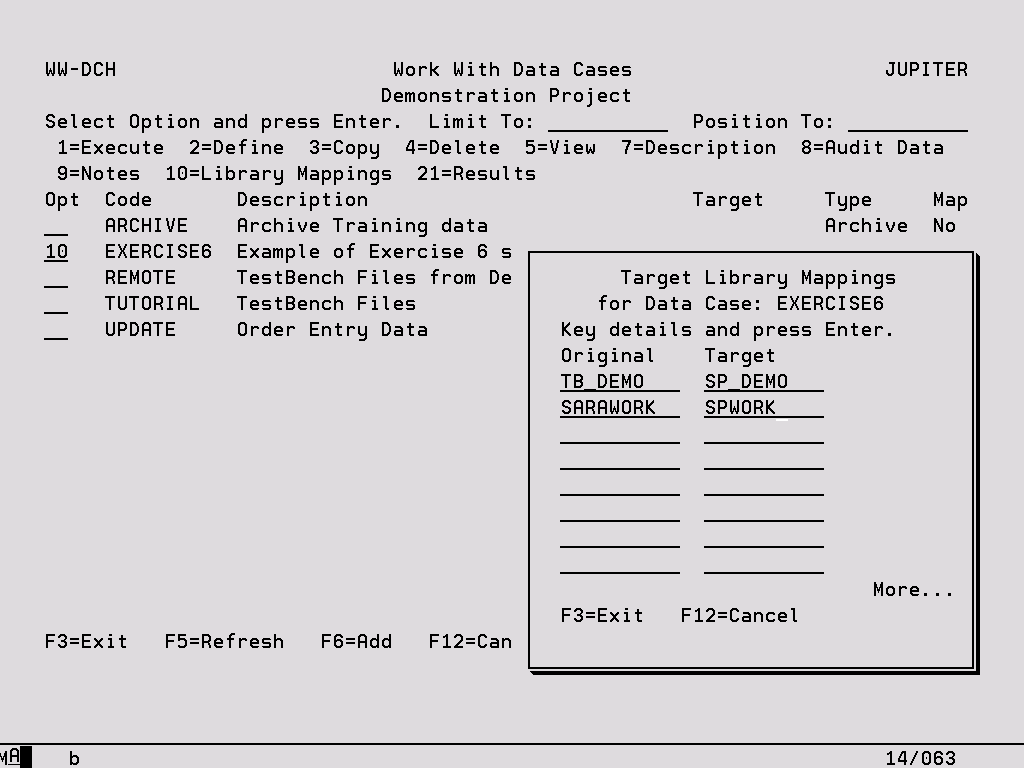
Original The library in which the object currently resides.
Target The library to which objects which are currently in the corresponding Original library will be extracted.
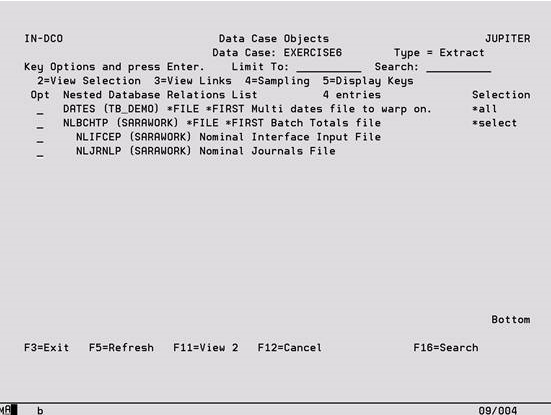
Data Case Objects
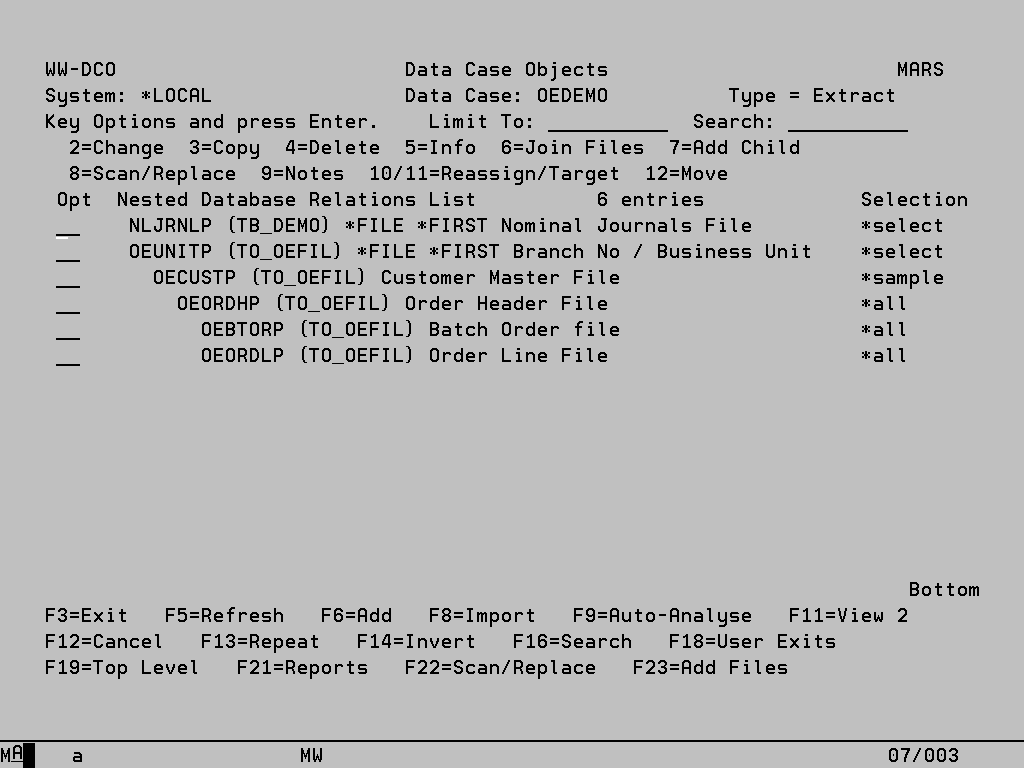
This facility shows the files and data areas included in the Data Case. For files, a ‘/M’ after the library name indicates that it is a multi-membered file. The relationships between the files are shown in the form of ‘tree branches’ with the primary limb highlighted. For each object within an Extract, Archive or Extract & Alter type case you can see whether there are record selection rules in place (select), whether record or field sampling has been defined (sample), whether files have been joined to other files for selection purposes (join) or whether the records to be selected are to be based on records already selected from other files. For Alter, or Extract & Alter type cases by pressing F15, you can see whether there are any updates defined for each object (Yes/No) and if there are, whether any selection rules have been defined for these updates (Sel/*All). You will reach this screen by selecting ‘Define’ from Work With Data Cases.
The prior limit for total number of files/members in a Data Case was 32,000.
As of version 8.3.0, it has now increased to 99,000 objects.
Limit To Key a character or characters to subset the display to records that have the same initial key values. Leave blank to have all records available via scrolling (or page up/down).
Search Use in conjunction with F16 to place the cursor at the next occurrence of an object in the list.
Options
2 – Change Change the details of an individual File or Data Area on the Object Details display.
3 – Copy Copy a File or Data Area, including all objects based on a file in the tree branch. The copy can either be to the same Data Case or to a different Data Case in this or another Project. If copying to another Data Case only top level files can be selected, although all based on files will also be copied.
4 – Delete Delete a File or Data Area from the Data Case, including all objects based on a file in the tree branch. If chosen it takes immediate effect.
5 – Info Either display the file description, including any key fields and logicals built over the physical, or display the contents of the data area.
6 – Join Files Join the file to one or more other files so that selections can be based on data from all joined files. See later section for more information.
7 – Add Child Create a new object with the based on file details already defaulted. (See the section on Object Details.)
8 – Scan/Replace Replace Library, Max Records, Data Option values and Member Name for the object and all of its dependent files. A window is displayed to enter the replacement values.
As of TestBench 8.2.0, the object name parameter can be changed as well. For customers, that have the need to change the object name, for example to rename with a prefix to designate which files have now been converted to a SQL table.
9 – Notes This option allows you to record notes for the Data Case Object as a means of documentation.
10/11 – Reassign/Target
Place option 10 against one or more files which have been assigned to the incorrect parent file. Use in conjunction with a single option 11 which denotes the new parent file to which the selected objects will be assigned. Option 10 can also be used against top level files which currently have no parent file assigned. When Enter is pressed additional screens are displayed to enable the new file links to be established, see the following section for more information.
12 – Move Move a File or Data Area, including all objects based on a file in the tree branch. The move must be to a different Data Case in this or another Project. All based on files will also be moved.
Function keys
F5 – Refresh Refresh the display. The description of this function key will be highlighted whenever details of any Data Case Objects have been altered through Object Details.
F6 – Add Create a new Object in the Data Case. (See the section on Object Details.)
F8 – Import Not supported in Extractor. Use this function if the files to be included in the Data Case are already defined in a Compare Case or Warp Case. (Compare and Warp Cases are available in TestBench). A separate window will then offer choices to enable this information to be imported into the Data Case. See following section for more information.
F9 – Auto-Analyse This facility will automatically bring files into the data case from a specified library and create the relationships between them. It will also optionally include data areas. (See specific section.)
F11 – View 2 Alternate view showing file record counts, only valid when viewing the ‘Selection’ display mode.
F13 – Repeat Duplicate the first option on the screen to the end of the display.
F14 – Invert The system can support both Master-file and Transaction-file led extractions. Use this facility to create a new Data Case containing the opposite type of database model for the same set of files. For example, Auto Analyse can be used to create a tree structure with the master files at the head of each branch. This model could then be inverted to create a model where the transaction level files appeared at the highest level. Selections could then be placed against these transaction files, and all related records in the master files would also be extracted.
F15 – Type Only shown for an Extract & Alter type Data Case, toggle between a view of those objects with selection criteria for the extraction, and those for which updates have been defined.
F16 – Search Enter an object name in the Search prompt and press F16 to place the cursor at the next occurrence of that object in the list.
F18 – User Exits User Exit points can be defined which will be actioned during extraction. For example, should you require a program or command to be executed after the new data has been extracted this can be added as a User Exit. See System chapter for further information.
F19 – Contract/Expand Display either all objects in the Data Case, top level objects only, ie. data areas and files which are not based on another file, or top level objects and their direct children.
F21 – Reports Option to print the list of Data Case objects, and a report indicating the join fields, selection and update values for all files in the Data Case.
F22 – Scan/Replace Replace Library, Max Records, Data Option values and Member Name for all objects in the Data Case or for only those objects in a specific library.
F23 – Add Files This option enables a set of files to be added to the Data Case without performing an analysis of the file relationships, as an alternative to using F9 Auto-analyse. It will add files from a particular library using the file name analysis of name, generic*, *wild* or *All.
Reassign Files to a New Target
When options 10 and 11 are used on the Data Case Objects screen as described above to reassign one or more files to a new parent file, the following screen is displayed.
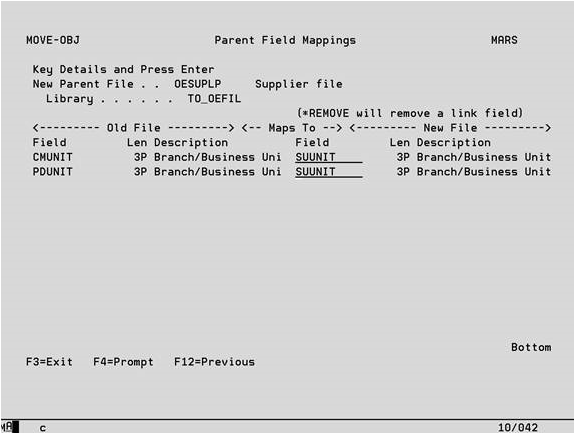
The new parent file that was selected on the previous screen with an option 11 is displayed at the top of the screen. All of the unique fields on the old parent file that were involved in links with its child files that have been chosen to be reassigned with an option 10 are listed in the left-hand column. An attempt will then be made to map these to fields on the new parent file (based on matching field name only) using the right-hand column. If the mappings have not been made automatically, use F4 to select the correct mappings from a list of fields on the new parent file.
If there is an old parent field for which no equivalent exists on the new parent file, key the text *REMOVE into the right-hand column. This will remove the field from the links involving the new parent file and its children.
If only top-level files for which there are no existing links have been selected with an option 10 on the Data Case Objects screen, this display is bypassed, and the following screen shown. Press Enter on the Parent Field Mappings to display the Child Movement Confirmation screen. All files that are being assigned to the new parent file are listed. Any files with errors in their links to the new parent file are highlighted, these links can be maintained using option 2.
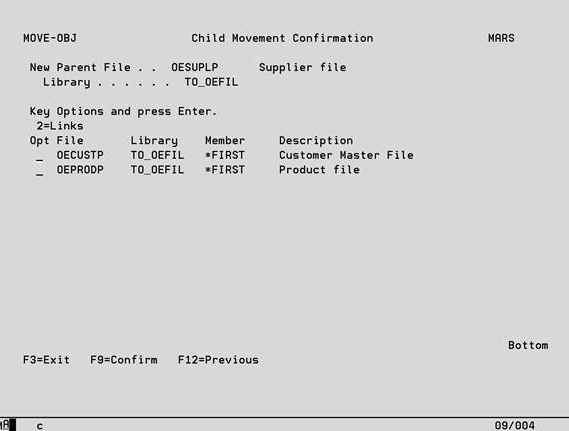
F9 – Confirm Once all errors have been resolved, press F9 to reassign listed all files to the new parent.
Copy to Data Case Window
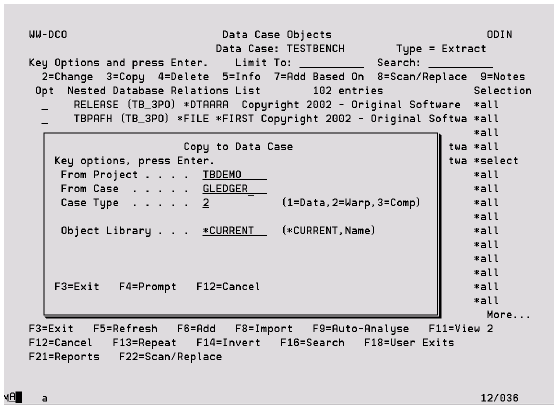
This function is not supported in Extractor. This panel is displayed after pressing F8 (Import) from the Work with Data Case Objects display. To populate the Data Case with a list of files already defined in a Compare Case or Warp Case, enter the codes and the object library to be used against each record to be added. This means that files already listed in a Warp Case can then be used to populate the list of objects to comprise a Data Case.
From Project To access the Compare Case or Warp Case being used as the source of the copy.
Copy from Case
2 = Copying from a Warp Case
3 = Copying from a Compare Case
Case Name Used as the source of the copy.
Object library Defining the location of the files to be added to the Data Case. Specify *CURRENT if the library name for the object in the case being copied can be used.
Auto-Analyse DB Relations
In order to perform an extract from a database and maintain the referential integrity of parent/child relationships between files, it is necessary first to understand these significant relationships. To perform this task manually can be very time consuming or simply not possible due to lack of detailed knowledge of the database. The purpose of Auto-analyse is to try to determine these relationships automatically by looking at the objects themselves. This function can produce a very good result on a structured, normalised database with consistent object and field naming standards.
As of TestBench 8.2.0, on the first pass of the analysis, Auto-analyse will automatically search for
referential constraints.
A referential constraint contains the following data.
The Parent file name and the Child file name.
The Parent and Child fields (columns) that are used to join the files together
The other Auto-Analysis options such as Access Path Search Sequence where the user has specified where to look for the keys will be considered on subsequent passes, once referential constraints have been exhausted.
The auto analysis will add both files in a parent / child configuration with link details.
Auto-analyse will also look for files at the apex of the hierarchy, such as Customer, Product, Warehouse, Company and then look for files which are dependent on these working its way down through the relationships until a complete model is built.
Whatever relations are found can be amended by the user to reposition files in the hierarchy or to change the fields used for the join. The analysis may also be performed over segments of a database, adding on further segments which have been analysed separately. These additions can be merged into the existing structure or appended to it without altering the current model.

You will reach this screen from the Data Case Objects display by pressing F9. For new Data Cases the options last keyed in on this screen by the current user will be remembered and re-displayed, these options are then stored with the Data Case for all users.
Library Key a valid library name from which the physical file definitions are to be extracted. Whilst you can only specify a single library, you can execute Auto-analyse as many times as required.
File Name Specify a specific file, a generic name (e.g. ABC), wild card selection (e.g. ABC* where * can represent any number of characters) or *ALL, to indicate which physical files are to be included in the analysis.
Minimum Records Limit the file selection to those with at least this number of records.
Maximum Records Limit the file selection to those with no more than this number of records. Please note that blanking out this field is the equivalent to entering a maximum of zero, filling the field with 9’s represents no upper record limit.
Data Areas Use option ‘1’ to include in the Data Case all data areas in the specified library and option ‘2’ to exclude them. Option ‘3’ will follow the same rules as specified for the File Name option.
Existing Files Determines which files will be included in the analysis.
1 – Analyse all files in the specified library and re-analyse any already present in the Data Case.
2 – Analyse all files in the specified library only. Any existing relationships in the Data Case will remain unchanged.
3 – Analyse all files in the specified library. New files may be based on those already existing in the Data Case, but existing relationships will not be re-analysed.
4 – Only analyse the files that are already present in the Data Case. If ‘4’ is specified the Library and File Name options must be blank.
Auto Analyse will look for fields that make up part of a key to a file on the basis that these will be the significant fields. The User can specify preferences for which type of key should be used, or looked at first as well as defining how field names may vary from one file to another in the case of, for example, a file identification as part of the field name.
To cater for differing standards and naming conventions a number of choices can be specified to drive the Auto Analyse process:-
Master Dup Keys If there are two or more files with identical keys, for example a master and extension file, option ‘1’ will join these files. The first file found in alphabetical sequence will become the top level file, and all others will be based on it. Option ‘2’ will not join these files.
AccPth Search Seq These fields determine where Auto-analyse will look to find the main file keys in order to build the database relationship model. Choose between looking for indexes in uniquely keyed Physical files, named Logical files (where the name is derived from the Physical), uniquely keyed Logicals, non-unique keys in Physicals or any other logical. The User can tell Auto-analyse to use one or any combination of the above by specifying the priority sequence. So for example, you might say that the best logical to be used is normally the PF file name with L1 added to the end, but in case that does not exist, check for a unique logical and in case that does not exist use the PF keys or any other available logical.
IMPORTANT NOTE
If you include choice 5 (other LFs) in your criteria, and Auto-analyse is not able to locate a relationship using the higher priority indexes, it will look in alphabetic sequence at any other logical files. If it is able to find a relationship using one of these logicals to another file already in the hierarchy it will create a join. However, there is no telling whether the join is of any useful significance in the data base or will be a valid basis on which to perform an extraction. It is recommended that this be used with care.
If your database does not have very good naming standards but you are able to identify the logicals that would describe the best fields for joining, consider copying the physicals and these logicals into a separate library (the data is not required) and performing the analysis over this. In this case, choice 5 will be beneficial.
Data Case maintenance has a view of number of records to help the user decide whether a selection is unnecessary and if a more pragmatic approach can be adopted. For example, if a file has only 100 records in it, it may not be worth spending a lot of time trying to correctly position it in the hierarchy as the whole file might as well be retained.
Key Field Posns Auto-analyse works by matching field names in the analysed files (as long as they are in the same type group). For the purposes of matching field types are split into two groups:-
a) Character and hex
b) Packed, signed/zoned and binary
Specify ‘1’ to include the field name character in the match and ‘2’ to exclude it. (There are occasions when it is not appropriate to include the entire field name in the matching process. A good example would be Cool/Synon generated databases where all field names are unique as the first two characters of each field name indicate its file location. In this case to ensure that matching does occur, you would specify that the first two characters should be excluded.)
When to replace Specifies when the character suppression detailed in the ‘Key Field Posns’ prompt should be applied. Options ‘1’ and ‘2’ cause Auto-analyse to make two attempts at matching file keys, either with or without using the character suppression, these options defining the sequence in which this is done. Option ‘3’ means that one attempt is made using the character suppression only, and if option ‘4’ is specified any information in the above option will be ignored and the complete field names used for matching.
Replace from This is used in conjunction with the previous fields. It determines whether the character suppression options start from the beginning or the end of the key field names and provides flexibility for key field names of different lengths.
For example:-
Key Field Positions 1 1 1 2 2 2 2 2 2 2
Field names ORDNUM, ORNUM
If this option was set to ‘2’ for End, Auto-analyse would begin at the end of the field name, use the first three characters for matching, and ignore the rest. Therefore, the above two field names would be considered to match. If this option was set to ‘1’ for Start then they would not match.
The following entries are only required if you request that the ‘based on’ relationships are to be built from keys found in a named logical file. (Option 3 for the ‘AccPth Search Seq field). You need to define how the logical file name can be derived from the physical file name.
Replace Trailing This is the number of trailing characters in the physical file name that are to be blanked.
Append String This is a constant value that should be appended to the end of every physical file name after requested blanking of trailing characters has occurred.
Force Characters This allows specific characters to be forced into selected positions within the physical file name. For example changing a ‘P’ in the third position to an ‘L’.
Function Keys
F4 – Prompt To show a selection list of all the libraries on the iSeries.
Select Based On File
If Auto-analyse detects more than one file on which another could be based (because of its key structure) then the following screen will appear so that the appropriate file may be chosen. This window is also displayed when the ‘Master Dup Keys’ option is set to ‘1=Join’, so that the two files with identical key structures can be joined the correct way around.
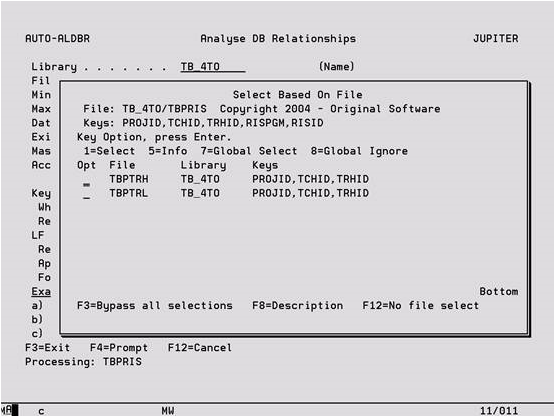
Options
1 – Select Select the file to be used as the ‘Based on’ file for the file name shown at the top of the window. This selection applies only to the single file currently being processed.
5 – Info Display information about the file including the field descriptions and access paths built over it.
7 – Global Select Select a file as the ‘Based on’ file and automatically select this file again if later it is one of the possible choices for any other files that might also be based on it. In this case, the user will not be prompted again for files contain this key field(s).
8 – Global Ignore Removes the input capable option field so that this file cannot be selected as the ‘Based on’ file in this instance or any other instances during this auto-analyse process.
F3 – Bypass Do not prompt for any more selections. If there is a choice pick the first file automatically (first in alphabetic name sequence).
F8 – Description Display the file description for each file in the list.
F12 – No file select None of these files are correct. Work back through the next level up. If there is more than one choice the window will be displayed again, if there is only one choice it will be selected automatically. If there are no other possibilities the file will be made a top level file.
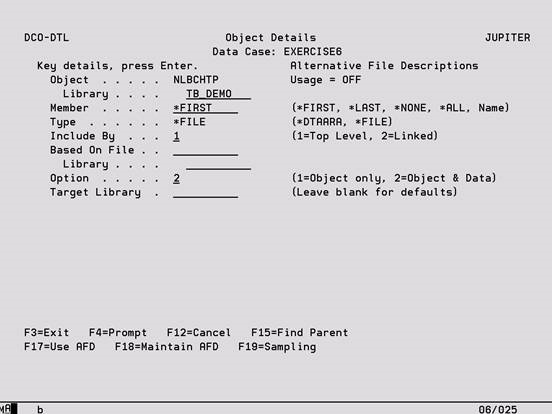
Object Details – Selection
This facility allows you to define the details for a file or data area. You will reach this screen from the Data Case Objects display.
Header Entries
These entries must be completed and Enter pressed before you will be able to key the Selection Rules.
Object Specify a valid physical file or data area name that will be found in the Library.
Library Specify a valid IBM i library name that currently exists.
Member Specify a member name, *FIRST, *LAST, *ALL or *NONE for files with no members. In the first instance the member name must exist. When *ALL is specified, any selection criteria will be applied to each member and the target file will contain the selected data for each member. Entries in this field are ignored for data areas.
Type This must be set to *FILE for files or *DTAARA for data areas.
Include By This must be set to ‘1’ for a top level file. If you change this to ‘2’, please refer to the following section.
Based On File This must be left blank for a top level file.
Option Key a 1 to create a duplicate of the object in the target library but not extract any records.
Target Library Key the name of the library in which the results of the extraction process for this object are to be placed. If specified, this must be a valid OS/400 object name and if it does not currently exist as a library, the library will be created when the Data Case is executed. This library overrides the Target Library on the Data Case Description and any Library Mappings that exist.
Function Keys
F4 – Prompt To show a list of available entries for Object (within current Type), Library, and Member (files only).
F15 – Find Parent Call a user-defined API program to retrieve the name of the object on which the file currently being defined is based. F15 is only enabled if the API (TBI004R) object can be found in the product library. Please refer to the Appendix chapter for more information on using this API.
F17 – Use AFD Press F17 to toggle AFD usage on and off for a file. If no AFD exists for the file, either for the specified library or for *LIBL, the AFD maintenance program will be called so that one can be created. AFD usage is ON by default for all new Data Case Objects if an appropriate one exists.
F18 – Maintain AFD Create or change Alternative File Descriptions.
F19 – Sampling Define File or Field level record sampling for the data to be extracted. See later section. This option can only be used if you are running TestBench or Extractor Advanced Edition.
Data Selections
Selection criteria can be entered for any file. The selection screen will appear upon pressing Enter for a top-level file, or may be accessed by pressing F8 when looking at the links for a linked file.
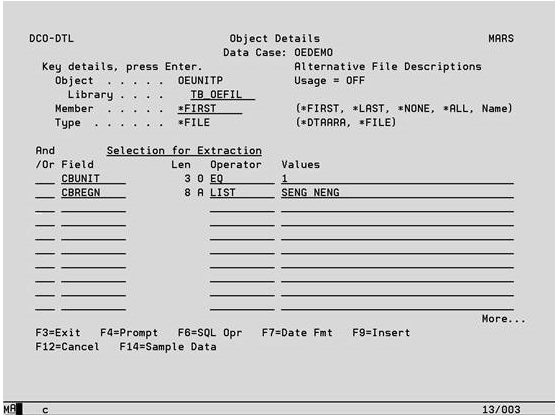
Selection Rules
Up to 100 list entries can be made to select which records are to be extracted from the file. Selection is not supported for data areas and the List Entry section will not be displayed for these objects. If any entries are made on a line, then the following validation must be satisfied.
AND/OR Specify how the rules on this line relate to rules on previous lines. If you leave this field blank, AND is presumed.
Field If keyed this must be a valid Field Name from the physical file or from an Alternative File Description if one is in use.
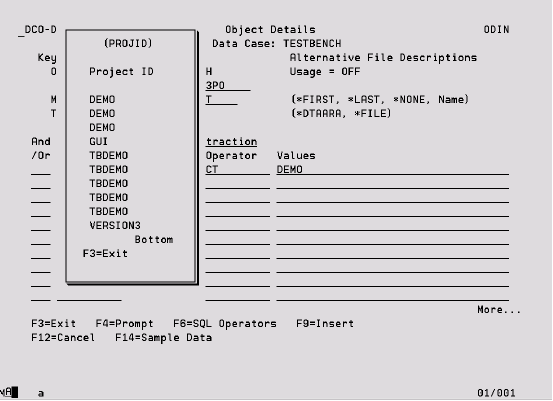
Operator If keyed this must be a valid code that is currently supported for Data Case selections. Position the cursor on this field and press F4 to see a list of currently supported Operators.
Values If a Field and Operator have been specified, key the value with which the Field is to be tested in combination with the Operator. Quotation marks are not required for alphanumeric fields, a sign can be keyed in the first position for numeric fields, and Date and Time type fields must be keyed with their separator characters.
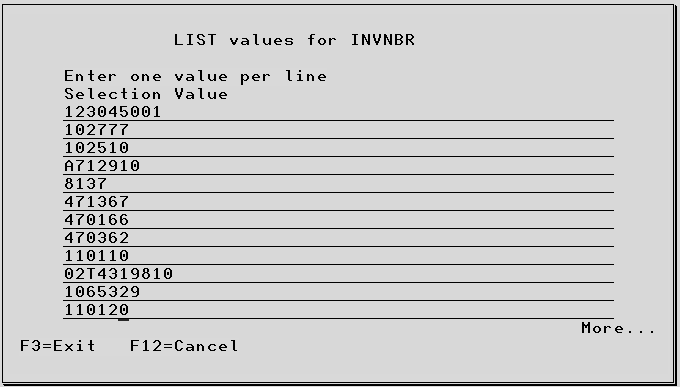
If no Field and Operator have been keyed, the complete SQL expression can be specified in the Value column using the Extractor Super SQL syntax. Alternatively, the field value can be expressed using the same method. See later section. If there is not sufficient room on the screen for the required value(s) press F4 in this field for a larger input area. When RANGE and LIST type Test Codes are used, the values must be separated by a blank character. If the data value being described also contains a blank this must be substituted with another character. Whatever character is chosen should then be entered against the Data Case Description (opt 7 on Work With Data Cases) as the blank substitution character. When the extraction is performed the character will be replaced with a blank.
The selection criteria can optionally be based on the contents of another file using the concept of ‘inner joins’. Note that files specified on the join are not included in the extracted data set.
Function Keys
F4 – Prompt To show a list of available entries for Field and Operator, or to extend the Value input area.
In version 8.2.0 and earlier, the Extended Values Display is 4 lines which can hold a varied amount of field values for max of up to 256 characters. The user separates each value with a space.
In version 8.3.0, when the Operator is LIST or NLIST, the Extended Values Display is extended
from 50 elements of 50 characters to 200 elements of 50 characters.
Note: The user specifies each field value on a separate line.
After entering or changing values in the list, to save the entries, press enter twice (once on the Values prompt, and once on the Object Details/Selection for Extraction screen).
F6 – SQL Opr View examples of the syntax for Super SQL. See later section.
F7 – Date Fmt Display a list of valid date formats that can be used in conjunction with the special value of *today in Super SQL Syntax – see later section for more information.
F9 – Insert Place the cursor on a line and press F9 to insert a new blank selection line there, the lines that follow are moved down.
F14 – Sample Data To access the Sample Data facility where the actual data from the current file will be shown.
F15 – Type Toggle Only shown for an Extract & Alter type Data Case, toggle between the selection rules for a file and the fields to be updated.
Object Details – Linked files
This facility enables you to define the details of a linked, (a file not at the top level of a tree branch).
For example, the Order Lines file is linked to the Order Header file. You will reach this screen from the Data Case Objects display.
Header Entries
These entries must be completed and Enter pressed before you will be able to key the File Field Linkages.
Object The physical file name that was specified on the prior Object Details screen is listed here.
Library The library name that was specified on the prior Object Details screen, it can optionally be changed here to another valid library name.
Member The prior member name entry from the prior Object Details screen appears here. It can be changed here. The options of *FIRST, *LAST, *ALL or *NONE for files with no member.
In the first instance the member name must exist.
See the following section for an explanation of the extract if *ALL is specified here.
Type The object type is listed here, and was entered from the prior Object Details screen.
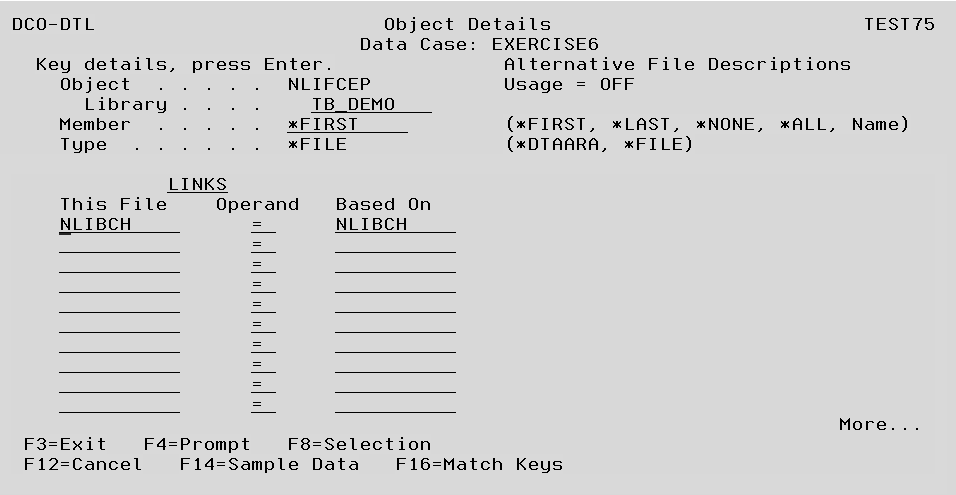
File Field Linkages ( LINKS )
Up to 100 list entries can be made to specify the fields in each file that define the linkage between them. Note that linkages are not in any way limited to current access paths, although there will be a run-time performance benefit if a suitable access path exists. If any entries are made on a line, then the following validation must be satisfied.
This File field Specify the name of any field from the current file, or a field defined in an AFD which is in use.
Operand The default value will be = ( equal to ). Additional operands are available via the F4 Prompt to display the additional Link Operators.
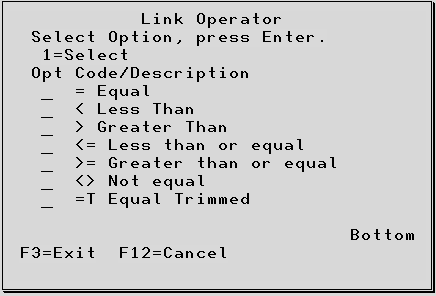
TestBench 8.3.0 introduces a new operand for the trim function: =T
This helps with the scenario where the user has a file that they would like to link to another file, but
there are extra spaces in one of the fields. The user would like to remove leading and trailing spaces
before comparing values.
Based On field Specify the name of any field from the Based On file or it’s AFD which matches by field type the entry in This File Field. The matching field type requirement does not extend to (P)acked and (S)igned types which can be cross-matched.
Function Keys
F4 – Prompt To show a list of available entries for This File Field and Based On File Field, from where options 1 to 9 can be used to select join fields in the correct sequence.
F8 – Selection Use F8 to access the screen for entry of record selection conditions which are to be applied in addition to the selection performed by the link to the based on file. For instructions on this screen refer to the previous section on Data Selections.
F14– Sample Data To access the Sample Data facility where the actual data from the current file or Based On file will be shown according to cursor position.
F16– Match Keys Create the field linkages automatically from any key fields which have the same name and attributes on both files.
Multi-member Files
In the case of join files, there are 3 Scenarios:-
Top Level File = *ALL (Multi-Member)
Linked File = Single Member
Top Level File = Single Member
Linked File = *ALL (Multi-Member)
Top Level File = *ALL (Multi-Member)
Linked File = *ALL (Multi-Member)
Scenario 1
In this example, PFAUDIT will become an amalgamation of the data of all the members in the Top Level file that satisfy the join criteria.
Scenario 2
In this example, PFMULTI will retain its multiple members with each member containing the data that is satisfied on the join criteria.
Scenario 3
In the scenario of both files being multi-member files, the joins will be performed matching on member names from the Linked file to the Top Level File. For example:
Monday —–> Monday
Tuesday —–> Tuesday
Linking a File to Itself (or see Join Files section for an alternate method)
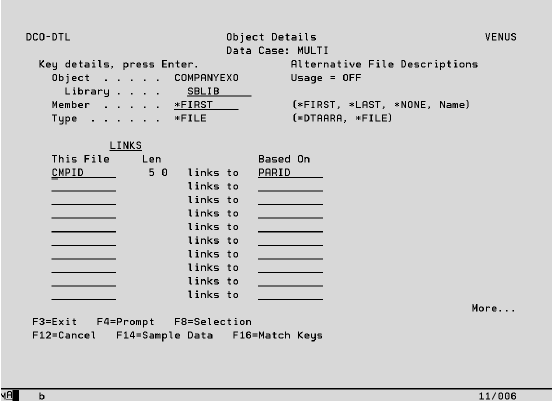
There are some occasions when there is a link between one record on a file and other records on the same file. In the following example the user may want to extract all information for the company Original Software (CMPID = 1). In order to get a complete set of information, other records on this file would also need to be extracted as they have Original Software as their parent company.
CMPID CMPTXT PARID
1 Original Software 0
2 Original Software Support 1
3 Original Training 1
4 Origsoft Inc 0
5 Original Documentation 2
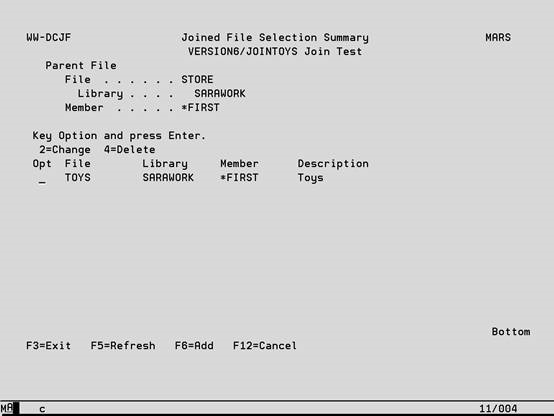
This can be done by first of all adding the company file to the Data Case and specifying the appropriate selection. Then key an option ‘7’ to add a file which is based on the company file and specify the same file again as shown below.
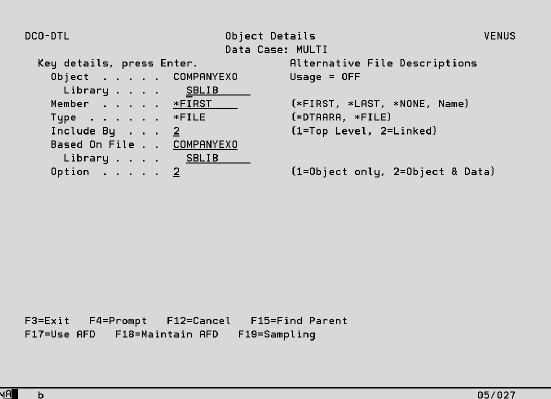
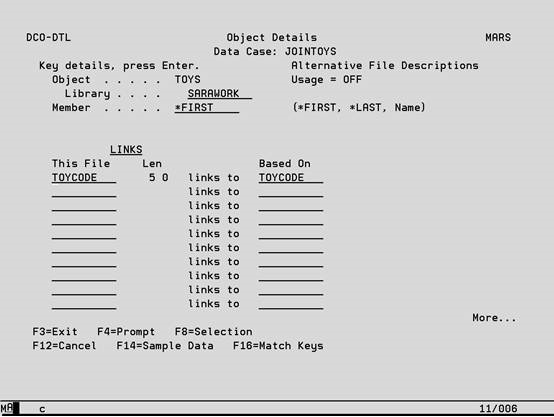
Then specify that records should be extracted where the CMPID is equal to the PARID of those records already extracted, as shown below.
The following records will be extracted:
• The selections on the first instance of the file will cause CMPID 1 (Original Software) to be extracted.
• The linked second instance of the file will cause all companies with a PARID of 1 to be extracted (Original Software Support and Original Training).
• The extraction process will continue until all linked records have been extracted, so the company Original Documentation will next be extracted as it has a PARID of 2, the CMPID of Original Software Support which is now present in the extracted set of data.
Notes:
• The fields involved in the selections or linkages do not need to be key fields for this type of extraction to be utilised.
• When a file is being added to the Data Case and linked to itself, option ‘7’ must be used, pressing F6 to add a new file will cause an error message to be generated.
Object Details – Update
This screen can be reached from the Data Case Objects display for an Alter type case and if in update mode for an Extract & Alter case (press F15 to toggle – this is not available for other Data Case types).
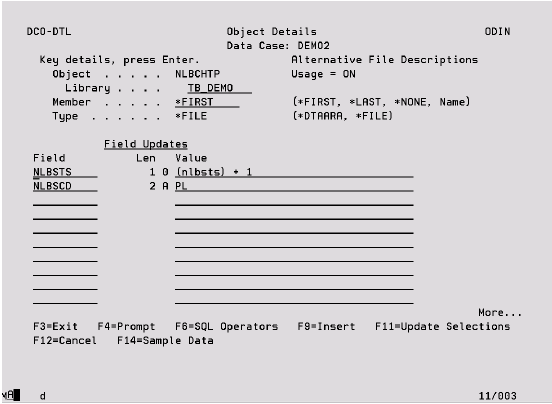
Field If keyed this must be a valid Field Name on the physical file and cannot be from an Alternative File Description.
Value If a Field has been specified, key the value with which the Field is to be updated. Quotation marks are not required for alphanumeric fields, a sign can be keyed in the first position for numeric fields, and Date and Time type fields must be keyed with their separator characters.
If no Field has been keyed, the complete SQL expression can be specified in the Value column using the Extractor Super SQL syntax. See later section. If there is not sufficient room on the screen for the required value(s) press F4 in this field for a larger input area.
Function Keys
F4 – Prompt To show a list of available entries for Field, or to display the extended Value input screen.
F6 – SQL Operators View examples of the syntax for Super SQL. See later section.
F9 – Insert Place the cursor on a line and press F9 to insert a new blank selection line there. The lines that follow are moved down.
F11 – Update Selections/Field Updates
Use F11 to access the screen for entry of record selection conditions which are to be applied to the updates. For instructions on this screen refer to the previous section for the similar Data Selection screen.
F14 – Sample Data To access the Sample Data facility where the actual data from the current file will be shown.
F15 – Type Toggle Only shown for an Extract & Alter type Data Case, toggle between the selection rules for a file and the fields to be updated.
Super SQL
To provide more flexibility when performing data extractions and updates there is a facility to enter an SQL statement directly using the Extractor Super SQL syntax. Examples of the valid SQL operators can be displayed by pressing F6 on any of the Selection or Update screens. The valid operators are listed below.
Operator Description
(Field) Field Name
(Field,1,1) Substring
(Field:DMY) Format of Date
& Concatenate
+ Add
– Subtract
/ Divide
* Multiply
= Equal To
<> Not Equal To
>= Greater Than or Equal To
> Greater Than
<= Less Than or Equal To
< Less Than
*CT Contains
*LIST List Check
*NLIST Not In List
*RANGE Range Check
*NRANGE Not In Range
*TODAY Today’s Date
*TODAYSTART Date+Time 00:00:0
*TODAYEND Date+Time 23:59:59
?? Run Time Variable
The rules for defining Super SQL are as follows:-
1 Field names must be valid fields on the file and not present in an Alternative File Description.
2 Field names must be enclosed in brackets.
3 Substring expressions must be enclosed in brackets and follow the format (Field name, Start Position, Length).
4 Constants should not be enclosed in quotation marks.
5 Any combination of fields and constants can be concatenated together using the & symbol.
6 The arithmetic expressions +, -, * and / can be used in conjunction with numeric fields and constants.
7 All of the test code operators which can be keyed into the Operator column also have an equivalent in Super SQL, with the exception of ISNULL and NOTNULL.
8 All individual items including fields, constants, arithmetic expressions and operands must be preceded and followed by a blank.
9 The Data Case substitution character must be used to represent any constant which contains an embedded blank.
Date Selections in Super SQL
There is a special Super SQL value of *TODAY which can be used to select dates which are equal to today’s date. The specifications for using *TODAY are as follows.
• *TODAY is a substitution variable for Current Date.
• *TODAY can optionally be adjusted by a number of years, months or days by following it with a ‘+’ or ‘-‘, a number and ‘d’,’m’ or ’y’. Only one adjustment factor can be specified at a time.
• The date format must be specified for all fields where *TODAY is used (except for date type fields), using the syntax (FIELD:YMD) for example.
• All normal operands are supported; RANGE, EQ, GT etc.
• *TODAY processing is not supported for Timestamp type fields or Julian date fields.
• AFD fields are supported when using the *TODAY function. This allows dynamic selection of dates when the day/month/year values are held in separate fields. The AFD definition must be created in a YMD (or similar) sequence and the format is also required in order to correctly create the *TODAY date value.
For example, the following statement will extract all orders placed in the last month:
(ORDERDT:LMD) *RANGE *TODAY – 1m *TODAY
As of TestBench 8.2.0, timestamp support was added:
*TODAYSTART will be substituted into the SQL as CCYY-MM-DD-00.00.00.000000
*TODAYEND will be substituted into the SQL as CCYY-MM-DD-23.59.59.999999
Example
Specify today for the create time field, the selection criteria is specified in the Value field as:
(CRTTIME) *RANGE *TODAYSTART *TODAYEND
Specify data selection for the last week (last 7 days) for the time creation field, in other words a range
of 7 days ago through the end of today:
(CRTTIME) *RANGE *TODAYSTART – 7d *TODAYEND
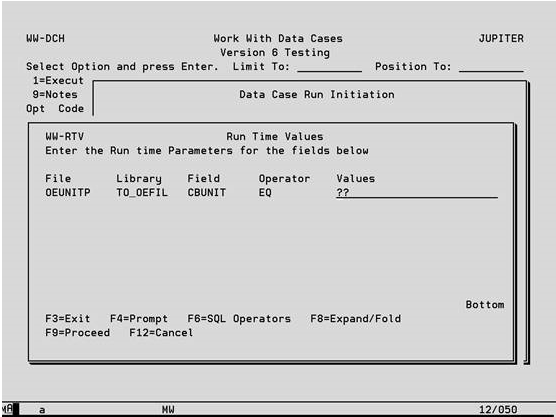
Run-Time Values
If the Operator or Value field contains only ?? then it signifies that this field will be prompted during the execution of the Data Case when the operator or value for selection or update will be keyed. Using run-time values may remove the need for users to access the Data Case maintenance functions, whilst still enabling them to execute a Data Case.
Function Keys
F4 – Prompt To display the extended Value input screen.
F6 – SQL Operators View examples of the syntax for Super SQL.
F8 – Expand/Fold Expand the view to show an additional line for each field which displays the field description.
F9 – Proceed Continue with the execution of the Data Case.
NOTE: Run time values cannot be included within a Data Case that will be submitted to batch via the Extract_IT command. The Data Case will not run and a message will be added to the job log.
Sampling
The following screen is accessed by pressing F19 on Object Details. Sampling can only be used if you are running TestBench or Extractor Advanced Edition.
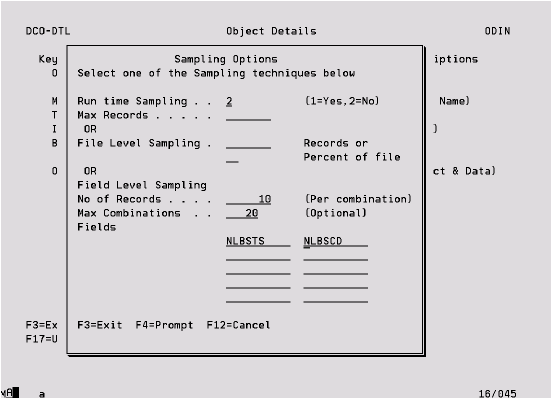
Sampling acts only upon the extracted and not the original data.
Run time Sampling Option ‘1’ will cause the Sampling Options window to be displayed when the Data Case is executed so that these can be changed at run time.
Max Records If entered will provide a cutoff point for records extracted from this file. Once this value is reached, the extraction will finish processing this file and move on to the next.
File Level Sampling If a value of 10 records is keyed for a file with a total of 100 records, this will cause every tenth record to be extracted from the file. The same result would be achieved by requesting 10 percent of the file. This option is only available for files with 800 fields or less.
Field Level Sampling Enables a specified number of records to be extracted for each unique value of a field or combination of fields. Optionally a maximum number of combinations can be specified, to avoid the unnecessary overhead for example of checking the complete file for an eleventh combination when it is known that only ten exist. This option is only available for files with 800 fields or less.
Join Files
Join files enable the power of data extraction to be extended by reducing the number of selections required and removing redundant records from the target database.
The join function creates a separate WHERE clause in the SQL that extracts the data.
There are four types of selection that are supported.
Where Exists
Where Not Exists
Sum
Count
Where Exists
For example for a Where Exists, your database contains the files Product by Store and Product Classification. You wish to extract all stores in Basingstoke which stock Baby Annabell products.
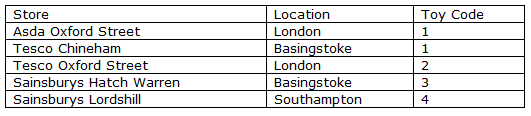
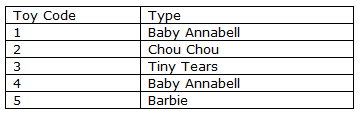
You could extract from the first file all stores in Basingstoke, but this would give Sainsburys Hatch Warren which does not stock Baby Annabell. You could extract from the second file all Baby Annabell dolls, but this would give Sainsburys Lordshill which is not in Basingstoke. Therefore you need to look at data on both files at the same time to get the desired records and no extras. Joining files enables you to do this.
Multiple join files can be created as described below. Selections may or may not be specified. If field selections are made then the joined file records must match the criteria. If no field selections are made then all available records for the link criteria will be selected. This will be the same as an existence check. When data is extracted, the join file criteria and any criteria specified on the file itself must be met in order for a record to be added to the target database.
Please note that data cannot be archived using Data Cases which contain join files.
To create join files, take option 6 on the Work With Data Case Objects screens to access the following display.
2 – Change Modify an existing joined file relationship. See the following screen for more information.
4 – Delete Remove an existing joined file relationship.
F6 – Add Create a new joined file relationship. See the following screen for more information.
Once either F6 or option 2 have been keyed, the following screen is displayed.
Header Entries
These entries must be completed and Enter pressed before you will be able to key the File Field Linkages.
Object Specify a valid physical file name that will be found in the Library.
Library Specify a valid library name that currently exists.
Member Specify a member name, *FIRST or *LAST. In the first instance the member name must exist.
Function Keys
F4 – Prompt To show a list of available entries for Object (within current Type), Library and Member.
F17 – Use AFD Press F17 to toggle AFD usage on and off for a file. If no AFD exists for the file, either for the specified library or for *LIBL, the AFD maintenance program will be called so that one can be created. AFD usage is ON by default for all new Data Case Objects if an appropriate one exists.
F18 – Maintain AFD Create or change Alternative File Descriptions.
F19 – Sampling Define File or Field level record sampling for the data to be extracted. See previous section.
File Field Linkages
Up to 100 list entries can be made to specify the fields in each file that define the linkage between them. Note that linkages are not in any way limited to current access paths, although there will be a run-time performance benefit if a suitable access path exists. If any entries are made on a line, then the following validation must be satisfied.
This File Field Specify the name of any field from the current file, or a field defined in an AFD which is in use.
Based On File Field Specify the name of any field from the Based On file or its AFD which matches by field type the entry in This File Field. The matching field type requirement does not extend to (P)acked and (S)igned types which can be cross-matched.
Function Keys
F4 – Prompt To show a list of available entries for This File Field and Based On File Field, from where options 1 to 9 can be used to select join fields in the correct sequence.
F8 – Selection Use F8 to access the screen for entry of record selection conditions which are to be applied in addition to the selection performed by the link to the based on file. For detailed instructions on this screen refer to the previous section on Data Selections.
F14– Sample Data To access the Sample Data facility where the actual data from the current file or Based On file will be shown according to cursor position.
F16– Match Keys Create the field linkages automatically from any key fields which have the same name and attributes on both files.
The other three types of selection for Join Files:
Where Not Exists
The not exists is the inverse of the Where Exists, there cannot be any records on the join.
Sum
An example of the SUM function would be to have an invoice header file in the data case with a join to the invoice line file. The join criteria can specify that the SUM of the invoice line amounts are more than 10,000. This would result in only high value invoices being included in the test data set and these are probably more complex invoices.
Count
In a similar way to the SUM function the COUNT could specify that an invoice must have more than 20 invoice lines before it gets extracted.
It is also possible to automate the extraction of data within a data case by the use of the Exists function. You may wish to extract data only created in the last 3 months. This can be achieved by specifying the date within the data case. The problem is the date may have to be specified multiple times within the data case and all instances of the date need to be manually updated on successive extractions. By creating a control file that holds a ‘from date’ value each file selection that previously had the hard coded date can be changed to a inner join and compare the date value to the date on the control table resulting in only the control table requiring periodic manual updates.
Sample Data Window
This facility shows the values of a single selected field in all records on the file. You will reach this screen by pressing F14=Sample Data on any of the Field Names in Object Details, including AFD fields. The objective is to assist in the choice of the correct field for linking or selection.
Use the roll up/down or page up/down keys to view the sampled data in the field you have accessed by pressing F14.
View a Data Case
The following screen is accessed using option ‘5’ to view a Data Case on the Work with Data Cases display. It lists all of the Data Case attributes that can be maintained using option ‘7’ from Work with Data Cases.
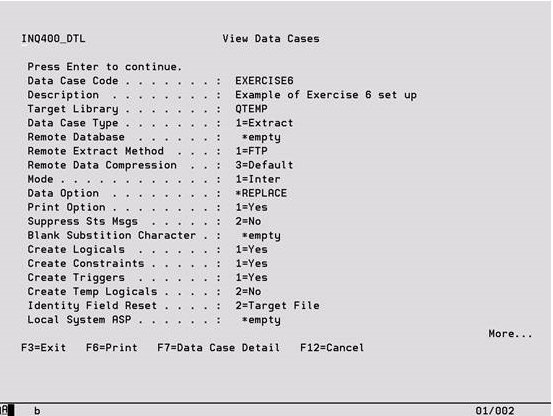
For an explanation of the fields on this screen, please refer to the previous Data Case Description section.
F7 – Linked Data View a list of the additional information that can be viewed for the Data Case. This information includes the Data Case Objects and any User Exits that have been added.
The following screen is displayed when F7 is pressed to view additional linked data on the previous View Data Cases screen.
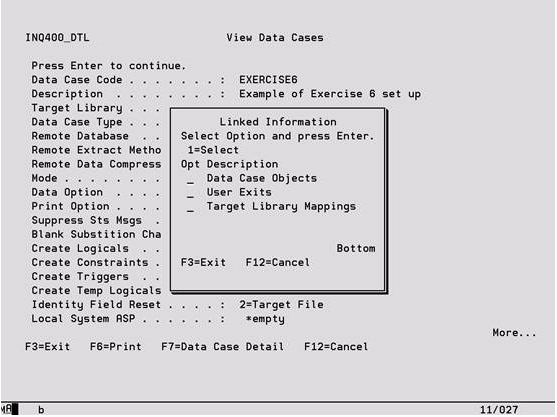
If option ‘1’ is keyed against Data Case Objects, the following screen is displayed. From here, all associated object information can be viewed using options ‘2’ to ‘5’ at the top of the screen. Please refer to the previous maintenance sections for explanations of the fields on these screens.