The following screen is accessed by keying an option ‘2’ on the Work with Users display. From this screen all authority levels for this User can be defined. The authority levels on the top line are changed using F7 for general authorities and are fully explained in the following section. All Project or Application specific authorities for this User are listed on the main section of the screen and can be maintained using the options and function keys shown. Press F11 to toggle the view between Projects and Applications.
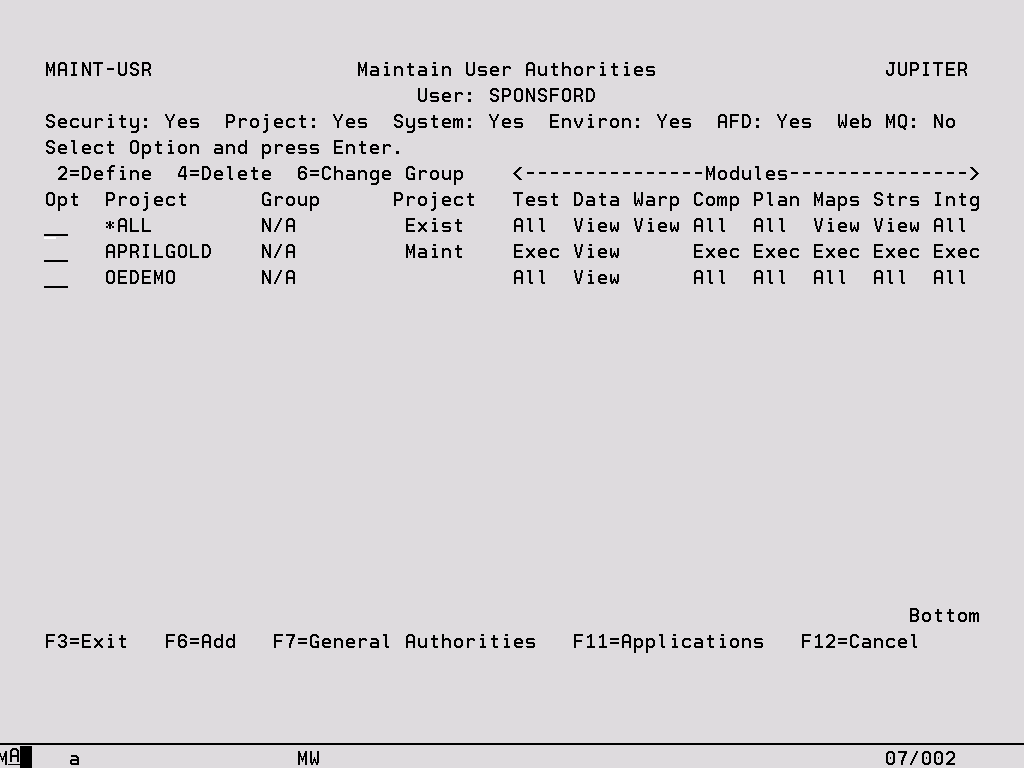
Options:
2 – Define Maintain individual User authorities for Projects or Applications or copy User authorities from a previously created Security Group.
4 – Delete Remove the Project or Application entry from the list. A confirmation screen is displayed before the deletion process begins.
6 – Change Group Display the screen shown below where a Security Group can be specified whose authorities will be used for this Project or Application.
Function Keys:
F6 – Add Create a new entry for a Project or Application. A new Project entry can only be added if Projects are being displayed on the Maintain User Authorities screen. Applications must be the current view on this screen if a new Application is to be added.
F7 – General Authorities Maintain authority for functions that do not reside within a Project and can therefore not be controlled by Project level authorities.
F11 – Applications/Projects Toggle the main screen view between Projects and Applications for which authorities for this User have been defined.
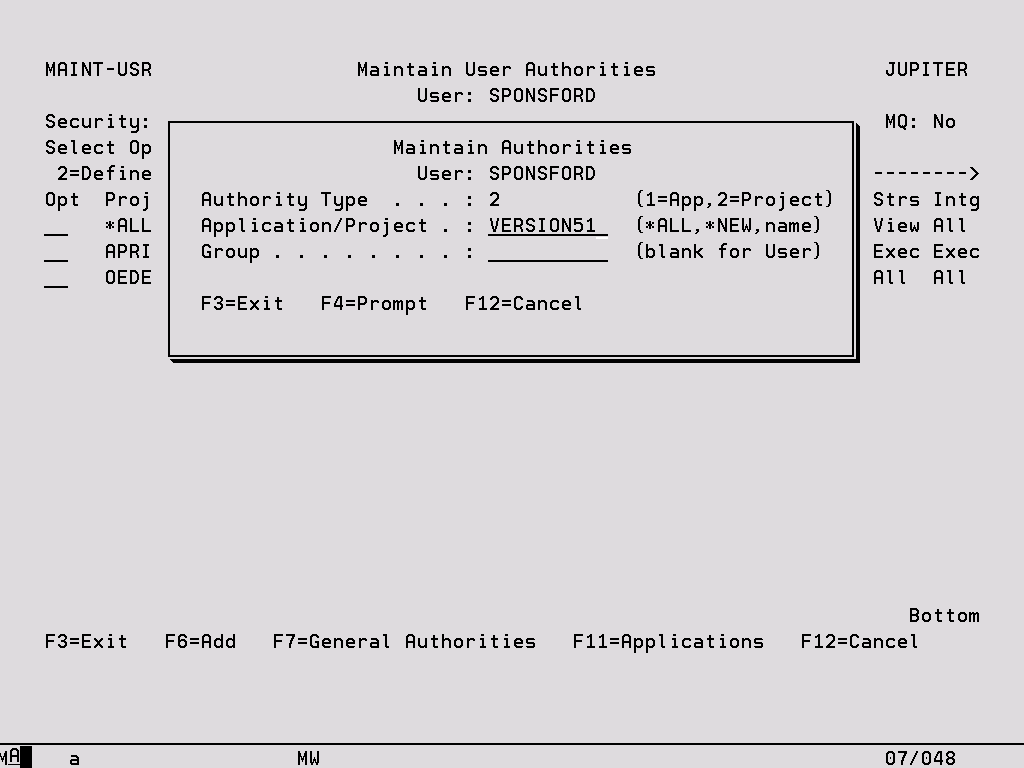
The following screen is displayed if F6 is pressed on the Maintain User Authorities display to add a new entry or if option ‘6’ is used on this screen to change the Security Group for an entry.
Authority Type This field is for information purposes only and indicates whether the entry relates to a Project or an Application (group of Projects).
Application/Project This field contains the name of the Application or Project for which authorities are being defined and can only be keyed when this screen is accessed using F6 for a new entry. For Projects it can also contain two special values. *ALL is an optional entry that contains the authority levels for the User for all Projects that do not have a specific entry on this screen and are not part of an Application. *NEW is an optional entry that contains the default authority values for all new Projects that are created by the User. When a Project is created, an authority entry will automatically be added for the Project and this entry can then be viewed and maintained on the Maintain User Authority display. The authority levels for the new Project will replicate those defined against the *NEW entry. If there is no *NEW entry the User will not have any authority to the Project that they have created. A list of valid values for this field can be displayed using F4.
Group Optionally specify the name of a Security Group from which authority levels for this Project or Application will be copied. When a Group is keyed, the authority levels for the entry cannot be changed, they must be altered at the Group level using option ‘2’ from the Work with Security menu. A list of valid values for this field can be displayed using F4.
When Enter is pressed on this screen or when option ‘2’ is keyed on the Maintain User Authorities screen, the following screen is displayed. Here the authority levels for the Project or Application are defined.
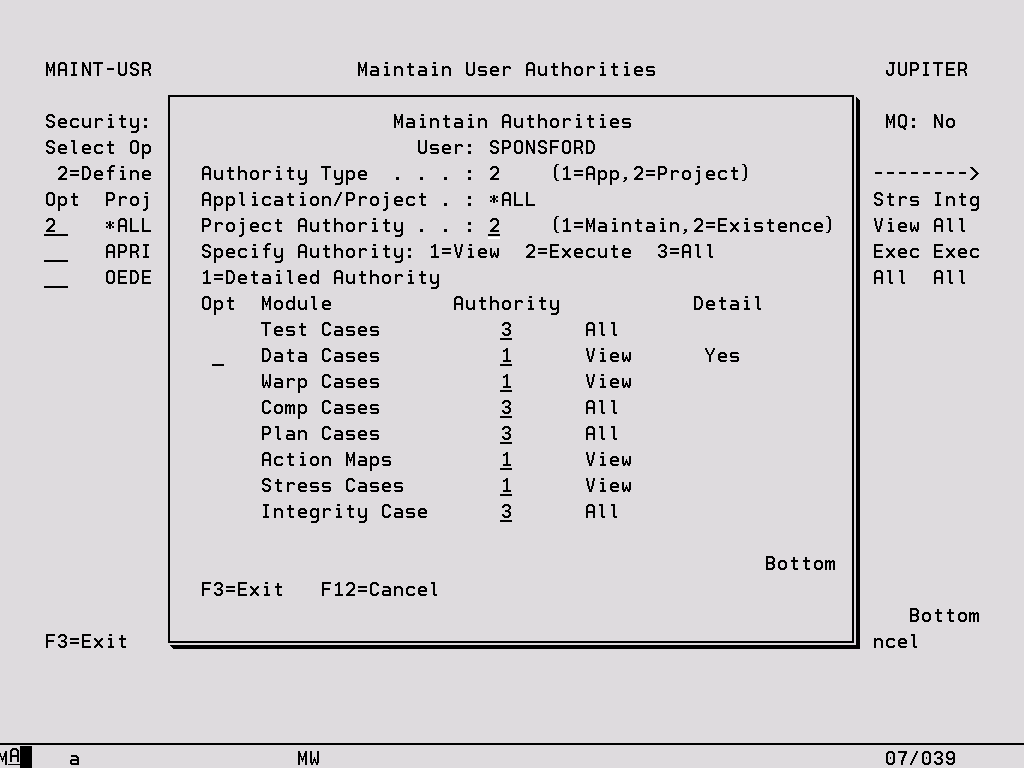
Authority Type This field is for information purposes only and indicates whether the entry relates to a Project or an Application (group of Projects).
Application/Project This field contains the name of the Application or Project for which authorities are being defined. For a Project it can also contain one of two special values, *ALL or *NEW. See the previous page for an explanation of these values.
Project Authority Option ‘1’ will allow the User to maintain the Project description, Project notes, Project level data rules and user exits. Option ‘2’ additionally allows the User to delete the Project. If this field is left blank the User has no authority to the functions controlled by options ‘1’ and ‘2’.
Module Authority Controls the level of authority that the User has to each of the listed modules. If left blank the User has no authority to this module within the associated Project or Application. Option ‘1’ allows the User entry to the associated Work with display (for example Work with Data Cases) and option ‘5’ to view details about the listed Cases can be used. Option ‘2’ will in addition enable the User to execute any of these Cases. Option ‘3’ provides full access, enabling any of these Cases to be viewed, executed, modified or deleted. In order to copy a TestBench or Extractor Case, the User must have ‘All’ authority within the target Project.
Opt Only valid for Data Cases, an option ‘1’ here further defines authority at the detailed level. If any detailed authority has been set up this is reflected in the right-hand column. See below for more information.
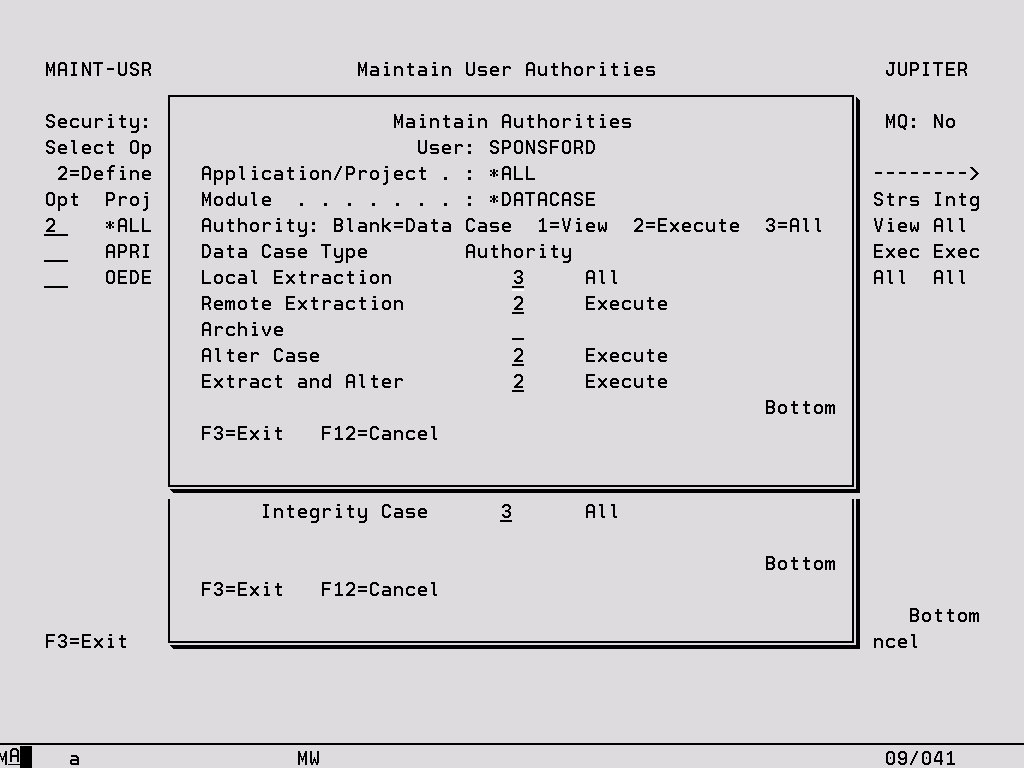
Key an option ‘1’ next to Data Cases when maintaining module authorities to access the above screen. It enables the five types of Data Cases to be individually controlled. If the detailed authority for any of the Data Case Types is left blank, the authority level specified against Data Cases on the previous screen is applied.
General User Authorities
The following screen is accessed using F7 on the Maintain User Authorities display. It enables authorities to be defined for this User which are not Project specific.
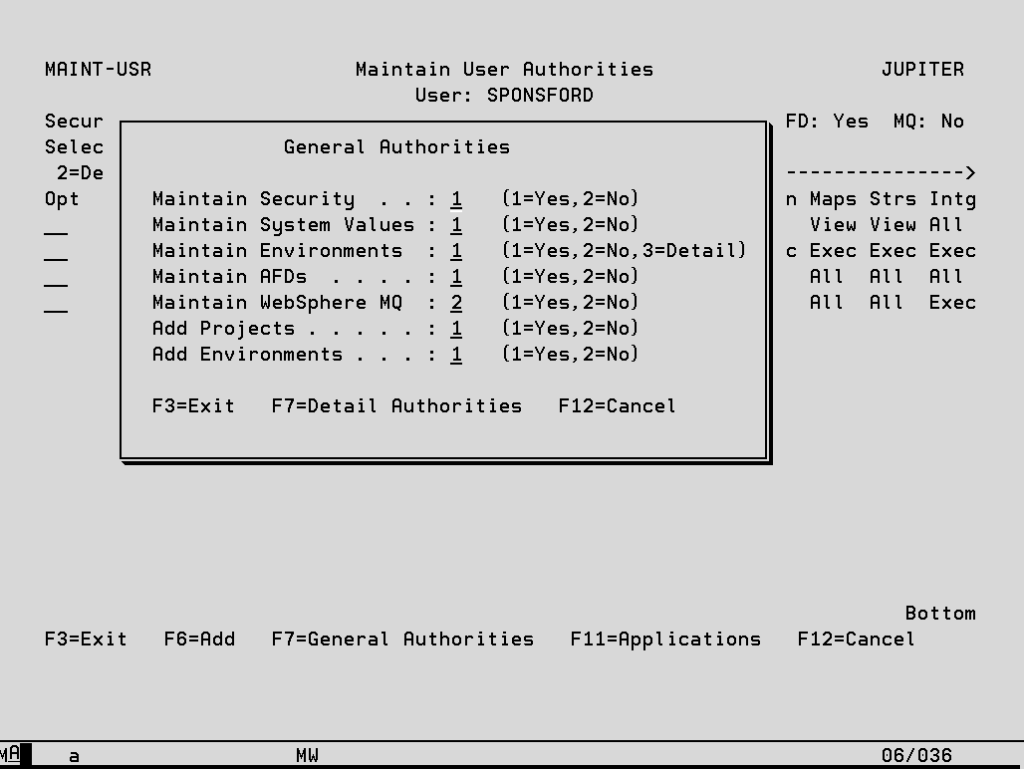
Maintain Security Option ‘1’ means that this User is a Security Controller and has the authority to change any of the security settings. All Security Controllers are listed when option ‘53’ is entered on the TestBench Main Menu or option ‘13’ on the Extractor Main Menu. Option ‘2’ will prevent the User from accessing the Work with Security menu.
Maintain System Values If this option is set to ‘2’ the User will be prevented from accessing the following options on the TestBench Utilities and Information Menu (option ‘51’ from the TestBench Main Menu) and any equivalent options on the Extractor Main Menu.
- WrkJrnAnl to analyse journals
- Data Case System Template
- System Values
- System Level Test Sheets
- Work with Product Groups
Maintain Environments If this option is set to ‘1’ the User will have full access to all of the Test Environments defined within TestBench. Option ‘2’ will prevent the User from accessing option ‘23’ from the TestBench Main Menu. Option ‘3’ means that authority is controlled at the specific Test Environment level, this is defined using F7 on this screen.
Maintain AFDs If this option is set to ‘1’ the User will have full access to all of the Alternative File Descriptions defined within TestBench or Extractor and will be able to create new ones. Option ‘2’ will prevent the User from accessing option ‘22’ from the TestBench Main Menu or option ‘5’ from the Extractor Main Menu.
Maintain WebSphere MQ If this option is set to ‘1’ the User will have full access to TestMQ. Option ‘2’ will prevent the User from accessing option ‘24’ from the TestBench Main Menu.
Add Projects The User will only be able to add new Projects if this option is set to ‘1’. Any Projects added will have the authority as defined under the *NEW entry on Maintain User Authorities. If there is no such entry the User will not have any authority to the new Project and will have to obtain authority from a Security Controller.
Add Environments The User will only be able to add new Projects if this option is set to ‘1’
F7 – Detail Authorities If option ‘3’ has been selected for the Maintain Environments option above, this enables the user to be given access to specific Test Environments.