A Connection must be created before any Test Assets such as Scripts or Plans can be created or accessed. The following screen is accessed by selecting the “Add a new connection” or “Edit this connection” icons from the Login screen or from the Add Connection Wizard during a first time install.
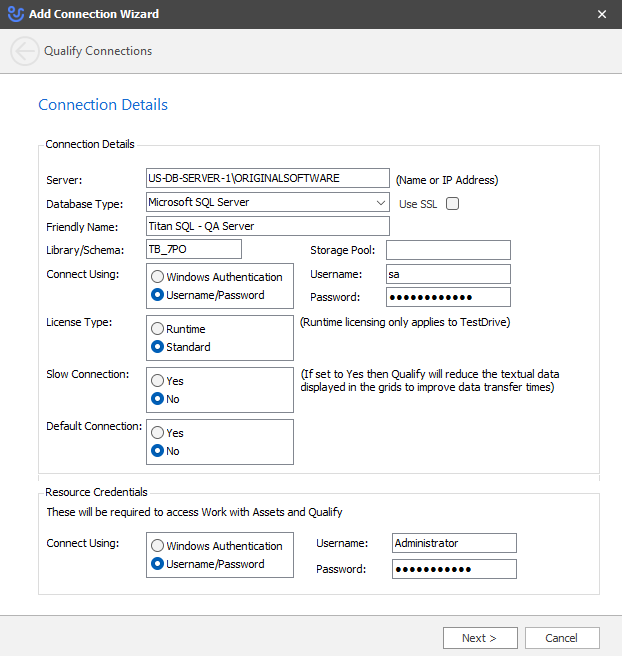
Server: Enter in the name of the server or its IP address.
Database Type: Select either IBM System i DB2, Microsoft SQL Server, or Web Service.
Use SSL: Select this checkbox option if your organization is utilizing Secure Socket Layer connections for this specific server. The pre-requisites are the server needs to be defined for SSL and a certificate is required. Contact your System Administrator for guidance.
Friendly name: A more descriptive name can be specified by which this connection will be referred.
Library/Schema: If using the IBM i (iSeries) as the server this is the library in which the TestBench application is stored and should be left as the default TB_xPO. For SQL Server, enter in the name of the Qualify database.
Connect Using: Determines whether Windows Authentication or User Name and Password will be used to log on to the server. See Windows Authentication section for more information.
Username/Password: The User ID and Password that will be used as the default for all server connections, provided Windows Authentication has not been selected. If Windows Authentication has been selected then these fields can be left blank. The User ID and Password are optional fields and should be entered if your database requires it.
License Type: The default mode in which scripts will be executed when using this connection. Select from Standard, where all functionality is available, or Runtime, where functionality is restricted and many maintenance options are unavailable.
Slow Connection: If you are connected to the server on a very slow connection, there are several areas throughout the product where, for performance reasons, functionality is conditioned on this option.
Default Connection: A connection with this option enabled will always be used in preference to one without it set for the same server/library, when checking permissions against TestDrive Assets. So, if you have two connections, each referencing a different User ID, the default one will always be used when checking permissions on Scripts, Playlists, Variable Data and Worklists.
Resource Credentials: Optionally key in the User Name and Password which is set up within the Resource area. If one or both of these properties is left blank, they must be provided on the Login screen. With the option Windows Authentication selected, a link between Qualify and Active Directory enables a single group of users to be added to the Qualify resources collection. This provides single sign on capabilities and negates the necessity for resources to be duplicated inside of Qualify. To enable this functionality, see LDAP Server Settings in Qualify Global Admin. See the “Windows Authentication” area for more information.
When Qualify is installed for the first time on a server, Administrator is the only pre-existing User ID.
Enter Administrator into the User ID field and ‘password’ into the Password field. The next time you use this connection you will be immediately forced to change the password for the Administrator.
The password must be between 8 and 20 characters long, with a minimum of 8 characters. The password must contain a minimum of 1 uppercase, lowercase, number, and a special character.
From this point forward the administrator (or a user with administrator authority) must create any new Qualify permissions for users. See the specific Permissions sections for more information.
Once all fields have been keyed, click Next to display the following screen. If any errors exist, a red exclamation mark is displayed next to the field. Hover over the red, exclamation mark icon to view the error details.
For most installations, Plug-in Credentials screen may be empty. However, if you have defined any Plugins in the Administration area to enable integration with other systems such as Jira, TFS or one of your own then this screen will be populated. It enables the global credentials defined in Admin to be overridden to credentials specific to the User.
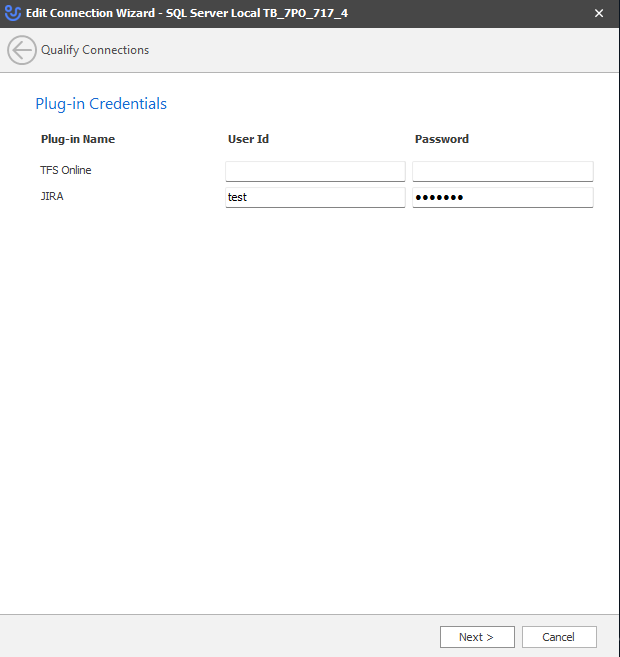
Click Next to display the following screen.

Resource Connection: If Qualify has been installed on more than one server or library/schema, this option can be used to centralise resource information. Choose one connection from which all resource data such as passwords will be retrieved.
Main License Connection: This option becomes enabled when a super-concurrent license exists. Select the connection which holds the main product licenses to be accessed by all servers.
License Location: Specify where Qualify should look for the license. By default, all connections are set to “Database level” but can be changed to “Library Level”, this might be important if you have more than one Qualify database being used by distinct groups of users who do not wish to share licenses. A specific library level license will need to be issued to you to support this.
Click Next and the Summary screen will appear, confirm the information, and click Finish.